I’ll never forget the morning I woke up with three small red bites on my arm. My stomach dropped immediately. Bed bugs are every homeowner’s nightmare, and discovering them in your mattress feels absolutely horrifying. The itching, the disgust, the sheer panic of knowing these tiny creatures are feeding on you whilst you sleep. Getting rid of bed bugs from a mattress isn’t impossible, but it requires patience, thoroughness, and the right approach. In this guide, we will show you how to get rid of bed bugs from a mattress.
I’ve helped several friends tackle infestations, and I’ve learned what actually works versus what wastes time and money. The good news? You can eliminate these pests without having to discard your expensive mattress.
This guide walks you through every step of the process. You’ll learn how to identify bed bugs correctly, treat your mattress effectively, and prevent future infestations. I’ll share the methods that actually work, not just the ones that sound good in theory.
Let’s tackle this problem systematically. Your peaceful sleep depends on it.
Understanding Bed Bugs and Why They Love Mattresses
Bed bugs are small, reddish-brown insects about the size of an apple seed. They feed exclusively on blood, making your mattress prime real estate for them. Mattresses provide warmth, darkness, and easy access to their food source (that’s you, unfortunately).
These pests hide in mattress seams, box springs, bed frames, and headboards during the day. They emerge at night, attracted by your body heat and carbon dioxide. A single female bed bug can lay hundreds of eggs throughout her lifetime. This rapid reproduction makes infestations escalate quickly if left untreated.
According to the Environmental Protection Agency, bed bugs have made a significant comeback in recent years. They’re found in homes, hotels, dormitories, and any place where people sleep. Don’t feel embarrassed if you have them. Bed bugs aren’t a sign of poor hygiene. They hitchhike on luggage, clothing, and used furniture indiscriminately.
Identifying them correctly matters tremendously. Many people confuse bed bug bites with mosquito bites or allergic reactions. Look for actual bugs, tiny white eggs, dark faecal spots on your sheets, or shed exoskeletons. These signs confirm you’re dealing with bed bugs rather than other pests.
Early detection makes elimination significantly easier. Check your mattress regularly, especially after travelling. Pull back sheets and inspect seams carefully. Small infestations respond better to treatment than established colonies.
Immediate Steps When You Discover Bed Bugs
Don’t panic, but act quickly. Your first instinct might be to throw everything away immediately. Resist that urge. Most mattresses can be saved with proper treatment. Hasty disposal often spreads bugs to other areas accidentally.
Start by containing the infestation. Strip all bedding immediately and seal it in plastic bags. Don’t carry loose bedding through your home. This prevents bugs from falling off and establishing new colonies elsewhere. Seal bags tightly before transport to the washing machine.
Isolate your bed from surrounding furniture. Pull it away from walls by at least 15 centimetres. Bed bug interceptors placed under bed legs prevent bugs from climbing up. These inexpensive traps catch bugs attempting to reach your mattress.
Avoid sleeping on your sofa temporarily. This common mistake spreads the infestation to new furniture. Bed bugs follow their food source. If you abandon your bed, they’ll follow you elsewhere. Continue sleeping in your bed whilst treating the infestation properly.
Document everything through photographs. This helps track progress and proves useful if you’re renting. Landlords may be responsible for treatment costs depending on your tenancy agreement. Clear photographic evidence establishes the problem’s extent.
Notify neighbours if you live in flats or terraced housing. Bed bugs travel through walls and shared spaces easily. Coordinated treatment prevents re-infestation from adjacent units.
Heat Treatment: The Most Effective Method
Heat kills bed bugs at all life stages, including eggs. This makes it the most reliable elimination method available. Bed bugs die when exposed to temperatures above 45°C (113°F) for 90 minutes or longer. Higher temperatures work faster.
Start with your bedding. Wash all sheets, blankets, pillowcases, and mattress covers in the hottest water possible. Most washing machines reach 60°C (140°F), which kills bed bugs effectively. Follow washing with high-heat tumble drying for at least 30 minutes. The dryer’s heat proves more lethal than washing alone.
For the mattress itself, steam cleaning provides excellent results. Professional-grade steam cleaners reach temperatures exceeding 80°C (176°F). Slowly pass the steamer over every centimetre of your mattress, paying special attention to seams and tufts. The steam penetrates fabric, killing bugs hiding deep inside.
Don’t rush the steaming process. Spend 10-15 seconds on each section, ensuring heat penetration. Move methodically across the entire mattress surface. Flip the mattress and repeat the process on the bottom side. Don’t forget the box spring, which often harbours more bugs than the mattress itself.
Portable steam cleaners cost $80-150 and prove invaluable for bed bug treatment. Professional pest control services charge $200-500 per treatment. Investing in your own steamer saves money whilst providing ongoing prevention capabilities.
After steaming, allow your mattress to dry completely before replacing bedding. Damp mattresses encourage mould growth. Use fans or open windows to accelerate drying. This typically takes 4-6 hours, depending on humidity levels.
Vacuuming: Essential for Removing Bugs and Eggs
Thorough vacuuming removes live bugs, dead bugs, eggs, and shed skins from your mattress. This step complements heat treatment beautifully. Use a vacuum with strong suction and a crevice tool attachment for best results.
Start by vacuuming every surface of your mattress systematically. Use the crevice tool along all seams, piping, and tufts where bugs hide. These areas harbour the highest concentrations of pests. Press firmly whilst moving slowly to dislodge eggs and debris.
Pay special attention to the mattress underside and box spring. These areas often contain more bugs than the sleeping surface. Remove the dust cover from your box spring if possible. Vacuum inside the box spring thoroughly, reaching all corners and crevices.
According to research from Rutgers University, vacuuming alone removes approximately 90% of bed bugs from accessible surfaces. However, it rarely eliminates infestations because bugs hide in inaccessible areas. This makes vacuuming an essential part of comprehensive treatment rather than a standalone solution.
Immediately seal the vacuum bag or empty the canister into a plastic bag after vacuuming. Dispose of this bag outside your home immediately. Bugs can escape from vacuum cleaners if not contained properly. Some people place the vacuum in a sealed plastic bag for 2-3 days, ensuring any surviving bugs die from starvation.
For optimal mattress cleaning equipment that helps with bed bug removal, visit our comprehensive guide to the best vacuum cleaners for mattress care. Look for models with HEPA filtration and strong suction specifically.
Repeat vacuuming every few days during treatment. This removes newly hatched bugs before they mature and reproduce. Consistent vacuuming significantly reduces population size over time.
Bed bug mattress encasements create an impenetrable barrier trapping bugs inside whilst preventing new infestations. These specialised covers differ significantly from regular mattress protectors. They feature bite-proof zippers and tightly woven fabric, preventing escape.
Quality encasements cost $30-80, depending on mattress size. This represents one of the most cost-effective bed bug treatments available. Once installed, leave encasements in place for at least 12-18 months. Bed bugs can survive without feeding for several months, but they’ll eventually die trapped inside.
Choose encasements specifically labelled “bed bug proof” or “bed bug certified.” Regular waterproof protectors don’t work because bugs escape through zipper gaps. Look for encasements with SecureSeal or similar locking zipper systems. These prevent even the smallest nymphs from escaping.
Install encasements on both your mattress and box spring. Bugs hide in box springs frequently, making their encasement equally important. Ensure the zipper closes completely without gaps. Even tiny openings allow bugs to escape or enter.
After installation, tape over the zipper end-to-end using duct tape. This provides additional security against escape. Replace the tape if it becomes damaged or loose. This small step prevents treatment failure significantly.
Encasements also protect against new infestations moving forward. If you travel frequently or buy used furniture, keeping encasements permanently makes sense. They provide peace of mind whilst remaining completely unnoticeable under your regular bedding.
Chemical Treatments: When to Use Pesticides
Chemical treatments should supplement physical methods rather than replace them. Many bed bugs have developed resistance to common pesticides. However, certain products remain effective when used correctly.
Diatomaceous earth (DE) provides a non-toxic option safe for home use. This fine powder damages bed bug exoskeletons, causing death through dehydration. Sprinkle food-grade DE lightly around your bed frame, under the mattress, and along baseboards. Avoid breathing the dust during application.
DE works slowly, taking several days to kill exposed bugs. It remains effective indefinitely as long as it stays dry. However, it only kills bugs that walk through it directly. This makes it excellent for perimeter protection but insufficient as a sole treatment method.
For severe infestations, consider professional pest control services. Licensed professionals have access to stronger pesticides unavailable to consumers. They also possess the expertise to apply treatments safely and effectively. Professional treatment costs $200-500, but guarantees results through follow-up visits.
If using over-the-counter pesticides, choose products specifically labelled for bed bugs. Read instructions carefully and follow safety precautions strictly. Many products require multiple applications spaced weeks apart. This targets newly hatched bugs that survived initial treatment.
Never spray pesticides directly on your mattress unless the label explicitly permits it. Many chemicals can be harmful when you sleep on treated surfaces nightly. Focus pesticide applications on bed frames, baseboards, and furniture instead.
Natural alternatives like essential oils (tea tree, lavender, peppermint) smell pleasant but provide limited effectiveness against established infestations. They may repel bugs temporarily, but they won’t eliminate colonies. Save these for prevention rather than active treatment.
Treating the Entire Bedroom: Beyond the Mattress
Bed bugs don’t confine themselves to mattresses exclusively. Successful elimination requires treating your entire bedroom systematically. Ignoring surrounding areas ensures re-infestation regardless of mattress treatment quality.
Start with your bed frame and headboard. Disassemble completely if possible. Vacuum all joints, crevices, and decorative elements thoroughly. Bugs hide in the tiniest gaps. Wooden furniture provides excellent hiding spots in joints and cracks. Apply diatomaceous earth or appropriate pesticides according to label directions.
Remove all items from your bedside tables and dressers. Vacuum inside drawers and along furniture backs. Check behind wall-mounted furniture carefully. Bed bugs often hide behind picture frames and wall decorations near beds.
Treat your carpet or flooring around the bed perimeter. Vacuum thoroughly, then steam clean if you have carpet. For hardwood or laminate, damp mop with hot water. Pay special attention to baseboards and moulding where bugs hide during daylight hours.
Curtains, especially those touching the floor near your bed, require treatment. Wash in hot water and dry on high heat. If they’re dry-clean only, seal them in plastic bags for several weeks. Extreme cold (below -18°C) for at least four days also kills bed bugs effectively.
Soft furnishings like throw pillows, blankets, and stuffed animals need heat treatment. Wash and dry everything possible. For items that can’t be washed, use your dryer’s high-heat setting for 30 minutes minimum.
Electronic devices like alarm clocks, lamps, and chargers require careful inspection. Bed bugs hide inside electronics occasionally. Seal suspected items in plastic bags for several weeks. This starves any bugs inside whilst preventing spread.
What to Look For When Choosing Treatment Products
Effective bed bug treatment products share several common characteristics. Understanding these helps you avoid wasting money on ineffective solutions. I’ve seen people spend hundreds on products that don’t work because they didn’t know what to look for.
Verify that products specifically label bed bugs on their packaging. General pest control products often don’t work against these resilient insects. The label should list bed bugs explicitly, not just “insects” or “crawling pests.”
Check active ingredients carefully. For pesticides, look for pyrethrins, pyrethroids, neonicotinoids, or desiccants like diatomaceous earth. Each works differently, and combining multiple approaches increases effectiveness. Some populations show resistance to specific chemicals, making variety important.
For mattress encasements, certification matters tremendously. Look for products tested and certified by independent laboratories. Labels like “Bed Bug Certified” or mentions of passing ASTM F1980 testing indicate genuine protection. Non-certified covers often fail because bugs escape through inadequate zippers.
Steam cleaners should reach at least 80°C (176°F) to kill bugs effectively. Lower temperatures won’t eliminate eggs reliably. Check specifications carefully before purchasing. Many consumer-grade steamers don’t reach the necessary temperatures.
Read reviews from actual users dealing with bed bug infestations. Their experiences reveal whether products deliver promised results. Look for detailed reviews mentioning specific outcomes rather than vague praise.
Consider how products integrate into comprehensive treatment plans. No single product eliminates bed bugs alone. Effective solutions combine multiple approaches simultaneously.
Benefits of Professional Equipment and Tools
Professional-grade equipment makes bed bug elimination significantly more effective than basic household tools. Whilst you can manage infestations with consumer products, professional equipment offers distinct advantages worth considering.
Commercial steam cleaners produce hotter, drier steam than consumer models. This kills bugs faster whilst preventing excessive moisture damage to your mattress. The investment ($200-500) seems steep but pays for itself quickly compared to repeated professional treatments.
HEPA vacuum cleaners trap microscopic bed bug eggs and prevent their escape. Standard vacuums may recirculate these tiny eggs back into your room. For recommendations on effective mattress vacuums, our guide to the best vacuum cleaners for mattress cleaning covers top-performing models specifically.
Professional bed bug monitors use carbon dioxide or heat to attract bugs, confirming whether infestations persist after treatment. These devices cost $30-100 but provide peace of mind. They detect low-level infestations before they become visible problems again.
Bed bug interceptors placed under bed legs catch bugs attempting to reach your mattress. These simple traps cost just $10-20 for a set of four. They provide early warning of new activity whilst preventing bugs from accessing your sleeping area.
Properly equipping yourself costs less than one professional treatment, typically. If you live in high-risk areas (urban flats, frequent travellers), these tools provide ongoing protection, justifying their cost many times over.
Versatility of Treatment Methods for Different Situations
Bed bug elimination strategies must adapt to different living situations and infestation severity levels. What works perfectly for one scenario may prove impractical for another. Understanding this versatility helps you choose appropriate approaches.
For light infestations caught early, heat treatment combined with thorough vacuuming often suffices. You can manage everything yourself without professional help. This saves money whilst effectively eliminating small populations before they establish.
Severe infestations require multi-pronged approaches combining heat, vacuuming, encasements, and chemical treatments. Professional pest control becomes necessary when DIY efforts fail repeatedly. Don’t waste months on ineffective home treatments. Recognise when expert intervention makes sense.
Rental properties complicate treatment because landlords typically bear responsibility for pest control. Document infestations thoroughly and notify landlords immediately in writing. Many tenancy agreements require prompt notification of pest problems. Landlords must arrange professional treatment in most jurisdictions.
Travellers need prevention strategies more than elimination techniques. Inspect hotel mattresses before unpacking. Keep luggage on racks away from beds and walls. Wash clothing in hot water immediately after returning home. These simple habits prevent infestations from starting.
Families with young children or pets require extra caution with chemical treatments. Focus primarily on heat and physical methods. If pesticides become necessary, choose products specifically labelled safe around children and animals. Follow application instructions meticulously.
Shared housing like dormitories requires coordinated treatment of all connected units. Treating one room whilst neighbours ignore infestations ensures rapid re-infestation. Building-wide treatments prove most effective in multi-unit dwellings.
Environmental Considerations When Treating Bed Bugs
Bed bug treatment can generate significant waste and use harsh chemicals if you’re not mindful. Balancing effective elimination with environmental responsibility requires thoughtful approach choices.
Heat-based treatments provide the most eco-friendly option available. Steam cleaning uses only water, producing zero chemical waste. It kills bugs effectively whilst leaving no toxic residues. This makes it ideal for families concerned about chemical exposure.
Diatomaceous earth offers another environmentally sound choice. This naturally occurring substance comes from fossilised algae. It’s non-toxic to humans and pets whilst effectively killing insects mechanically. Food-grade DE can even be consumed safely (though I wouldn’t recommend it).
When disposing of infested items, seal them completely in plastic bags. Mark bags clearly as “bed bugs” to warn waste collectors and prevent accidental spread. Some items like mattresses, may require special disposal depending on local regulations. Check with your council before leaving infested furniture curbside.
Avoid immediately discarding your mattress if possible. Millions of mattresses enter landfills annually, with many thrown away unnecessarily during bed bug panics. Encasements allow you to keep your mattress while ensuring bugs are trapped inside. This reduces waste significantly.
Choose pesticides carefully if chemical treatment becomes necessary. Look for products with lower environmental impact. Pyrethrins derived from chrysanthemum flowers break down faster than synthetic alternatives. They’re less likely to persist in the environment long-term.
Reusable items like mattress encasements, interceptors, and steam cleaners reduce waste compared to disposable solutions. These one-time purchases serve you indefinitely, preventing environmental impact from repeated product purchases.
Noise Levels During Treatment
Noise considerations matter surprisingly much during bed bug treatment, especially in flats or homes with light sleepers. Different treatment methods produce varying noise levels, affecting when and how you can use them.
Vacuuming produces moderate noise comparable to regular cleaning. Most people tolerate this during normal daytime hours. However, thorough bed bug vacuuming takes longer than routine cleaning. Expect 45-60 minutes of continuous operation. Consider neighbours’ schedules when planning extended vacuuming sessions.
Steam cleaners generate both motor noise and hissing sounds from steam release. Most models run quieter than vacuum cleaners but still produce noticeable sound. The slow, methodical process requires 30-45 minutes per mattress. Choose treatment times that won’t disturb sleeping family members or neighbours.
Professional heat treatments using specialised equipment can be quite loud. Industrial heaters and fans run for 6-8 hours continuously. Professionals typically perform these treatments during business hours when most people are away. If you’re home during professional treatment, expect significant noise disruption.
Chemical applications remain relatively quiet. Spraying pesticides or sprinkling diatomaceous earth produces minimal noise. This makes chemical treatments suitable for late evening or early morning application if needed.
Installation of bed bug interceptors and mattress encasements generates no noise whatsoever. These preventive measures can be implemented at any time without disturbing anyone.
For noise-sensitive situations, prioritise quiet methods like encasements and chemical treatments. Schedule loud equipment use during times when disturbance is minimised.
Brand Reputation and Reviews for Treatment Products
Choosing reputable brands significantly improves treatment success rates. The bed bug product market includes many ineffective solutions marketed to desperate consumers. Learning which brands deliver actual results saves money and frustration.
For mattress encasements, Protect-A-Bed and SafeRest consistently receive top ratings. Both companies specifically design products for bed bug prevention. Their encasements feature truly bug-proof zippers that cheaper alternatives lack. Customer reviews show high success rates in preventing and containing infestations.
Concerning pesticides, brands like Cimexa (silica gel), Harris (diatomaceous earth), and EcoRaider (natural formula) demonstrate proven effectiveness. These products show independent laboratory testing confirming bed bug mortality rates. Avoid generic pesticides without specific bed bug labelling.
For vacuum cleaners designed for mattress care and bed bug removal, our comprehensive guide to the best vacuum cleaners for mattress maintenance reviews top-performing models from trusted brands with proven track records.
Consumer advocacy groups like Which? and testing organisations like the EPA provide valuable research on treatment effectiveness. Their findings help separate marketing hype from genuine performance. Before purchasing treatment products, check whether independent testing validates manufacturer claims.
Read recent reviews from customers dealing with actual infestations. Old reviews may not reflect current product formulations or bed bug resistance patterns. Look for detailed accounts describing treatment protocols and outcomes.
Beware of miracle cure products promising instant elimination. Bed bug treatment requires time and persistence. Products claiming overnight results typically disappoint. Trustworthy brands set realistic expectations about treatment timelines and necessary follow-up.
Budget-Friendly Options for Bed Bug Treatment
Professional pest control costs hundreds of pounds, making DIY treatment attractive for budget-conscious households. Fortunately, effective bed bug elimination doesn’t require expensive solutions necessarily.
The most budget-friendly starting point involves heat treatment using items you already own. Your washing machine and tumble dryer become powerful weapons against bed bugs. Wash all bedding, pillows, and fabric items on the hottest settings. This costs only the electricity to run the appliances you’re using anyway.
Food-grade diatomaceous earth costs just $10-20 for enough powder to treat an entire bedroom. This one-time purchase provides months of protection. Apply it carefully around bed legs and baseboards for ongoing prevention.
Mattress encasements represent the best value in bed bug treatment. Quality encasements cost $30-80 but last for years whilst trapping bugs permanently. This single purchase often proves more effective than hundreds spent on repeated pesticide applications.
DIY steam cleaning can be accomplished with rented equipment if purchasing seems excessive. Many supermarkets and hardware stores rent carpet cleaners for $20-30 daily. These reach sufficient temperatures to kill bed bugs effectively. One day’s rental treats your entire bedroom thoroughly.
Free resources from government health departments provide treatment protocols proven effective. The EPA publishes comprehensive guides on bed bug elimination. Following their recommendations costs little whilst ensuring science-based approaches.
Budget strategies require more time investment than professional treatment. However, patient DIY efforts eliminate infestations successfully when done correctly. Save money without sacrificing effectiveness by combining multiple inexpensive methods simultaneously.
Eliminating bed bugs requires ongoing vigilance even after initial treatment appears successful. Eggs may hatch weeks later, and new bugs might hitchhike home despite your best efforts. Proper maintenance prevents re-establishment of infestations.
Continue regular mattress inspections weekly for at least three months post-treatment. Pull back sheets and examine seams carefully using a torch. Look for live bugs, shed skins, dark spots, or eggs. Early detection of any survivors allows immediate action before populations rebound.
Keep mattress encasements installed for 12-18 months minimum after your last bug sighting. This ensures any trapped bugs die completely. Don’t remove encasements prematurely, thinking the problem is solved. Patience prevents disappointing reinfestation.
Vacuum your mattress and bed frame weekly during the monitoring period. This removes any newly hatched bugs before they mature and reproduce. According to the Centres for Disease Control and Prevention, consistent vacuuming significantly reduces the risk of re-infestation.
Maintain bed bug interceptors under bed legs indefinitely as early warning devices. Check them weekly for trapped bugs. Their presence indicates treatment failure or new introduction from outside sources. Empty and clean interceptors monthly to maintain effectiveness.
Wash bedding in hot water weekly rather than your previous routine. This kills any bugs that might have reached your sheets before you detected them. Hot washing becomes a habit worth maintaining long-term.
Continue using diatomaceous earth barriers around your bedroom perimeter. Refresh the powder every few months as it can be dispersed by cleaning or foot traffic. This provides ongoing protection against bugs entering from adjacent areas.
Warranty Information for Treatment Products
Understanding warranty coverage for bed bug treatment products protects your investment and ensures satisfaction. Different products offer varying protection levels worth considering during purchase decisions.
Mattress encasements typically include warranties ranging from one to ten years, depending on brand and price point. Premium encasements offer lifetime warranties against defects and tears. These warranties usually require proof of purchase and proper use. Damage from improper installation or removal often voids coverage.
Read warranty terms carefully before purchasing. Some manufacturers require defect notification within specific timeframes. Others offer satisfaction guarantees, allowing returns if bed bugs escape encasements. These guarantees demonstrate the manufacturer’s confidence in their products.
Steam cleaners and vacuum cleaners include standard appliance warranties covering one to three years, typically. Extended warranties may be available for purchase. For expensive professional-grade equipment, extended coverage makes sense financially.
Chemical treatment products rarely include warranties due to application variability. Effectiveness depends heavily on proper use rather than product defects. However, most retailers accept returns of unopened pesticide products within standard return periods.
Professional pest control services should guarantee their work. Reputable companies offer follow-up treatments at no additional cost if bugs return within specified timeframes. Warranties typically range from 30 days to one year. Get guarantee terms in writing before service begins.
Document all purchases with receipts and photographs. This evidence proves useful if warranty claims become necessary. Some warranties require product registration within specific periods after purchase.
Common Cleaning Challenges and Solutions
Bed bug elimination presents numerous challenges that frustrate even determined homeowners. Understanding common obstacles helps you overcome them effectively rather than giving up prematurely.
Challenge: Bed bugs hiding in inaccessible areas like wall voids and electrical outlets survive treatment. Solution: Focus on making your bed an isolated island. Even if bugs hide in walls, preventing access to your sleeping area starves them over time. Use interceptors and encasements whilst treating accessible areas thoroughly.
Challenge: Repeated treatments seem ineffective because bugs keep returning. Solution: You might be dealing with re-infestation from outside sources rather than treatment failure. Check whether neighbours have bed bugs. Inspect used furniture before bringing it inside. Examine your luggage after travelling.
Challenge: Family members react differently to bites, confusing whether bugs remain. Solution: Not everyone reacts to bed bug bites identically. Some people show no reaction, whilst others develop severe welts. Don’t rely solely on bites for monitoring. Use interceptors and visual inspections instead.
Challenge: Children or pets interfere with treatment by disturbing diatomaceous earth barriers or removing interceptors. Solution: Explain the importance of treatment to children old enough to understand. For young children and pets, focus on methods that can’t disrupt, like encasements and sealed mattresses.
Challenge: Mattress is too heavy to flip for treatment underneath. Solution: Recruit help from friends or family. Two people can flip even king-size mattresses safely. Alternatively, treat one side, wait for it to dry, then flip and treat the other side. This takes longer but remains manageable solo.
Challenge: Steam cleaning leaves your mattress too wet. Solution: Use fans and dehumidifiers to accelerate drying. Point fans directly at the mattress and open windows for airflow. Consider treating only one side daily, allowing each side 24 hours to dry thoroughly.
Tips for Maximising Treatment Efficiency
Strategic approaches significantly improve bed bug elimination success rates whilst reducing the time and effort required. I’ve learned these efficiency tips through experience and research.
Create a written treatment plan before starting. Document which areas you’ve treated and when. Schedule follow-up treatments on your calendar. This organisation prevents missed steps that allow bugs to survive.
Treat your entire bedroom on the same day when possible. Simultaneous treatment prevents bugs from fleeing treated areas to untreated zones. Coordinated approaches eliminate hiding places comprehensively.
Work systematically from one side of the room to the other. Complete each area fully before moving forward. This prevents repeatedly covering the same ground while accidentally missing sections.
Combine multiple methods simultaneously rather than trying one approach at a time. Heat treatment plus vacuuming plus encasements plus diatomaceous earth works far better than any single method alone. Integrated pest management proves most effective according to university research.
Time treatments strategically around your schedule. Treat your bedroom on Friday evening, so you have the weekend for drying and follow-up work. This prevents disrupting your work week whilst ensuring adequate time for thorough treatment.
Document progress through photographs. Take before pictures showing evidence. Continue photographing throughout treatment. These records show improvement whilst helping you identify problem areas needing extra attention.
Enlist help from family members. Multiple people working together complete treatment faster and more thoroughly than solo efforts. Assign specific tasks to each person for efficient division of labour.
Frequency of Treatment and Monitoring
Bed bug elimination requires multiple treatments because eggs hatch on different schedules. Understanding proper treatment timing prevents premature declarations of victory that lead to disappointing comebacks.
Initial comprehensive treatment should address all infested areas simultaneously. This includes heat treatment, vacuuming, and chemical application where appropriate. Think of this as your main offensive, eliminating the bulk of the population.
Repeat treatments every 7-10 days for at least three cycles. This timing targets newly hatched nymphs before they mature and reproduce. Bed bug eggs hatch within 6-10 days, typically. Regular follow-ups catch new bugs whilst they’re still vulnerable.
After three treatment cycles, continue monitoring weekly for two months. Visual inspections and interceptor checks reveal whether any bugs survived. Finding live bugs requires immediate re-treatment of affected areas.
If you discover new bugs during monitoring, don’t panic. This doesn’t necessarily mean treatment failed. New introductions from outside sources happen. Treat discoveries immediately whilst investigating possible outside sources.
Complete elimination typically takes 4-6 weeks of consistent effort for light infestations. Severe infestations may require 2-3 months of persistent treatment and monitoring. Patience and consistency matter more than intensity for long-term success.
Once you’ve seen no evidence of bed bugs for two months straight, consider the infestation eliminated. However, maintain preventive measures indefinitely. Keep encasements in place and check interceptors monthly as ongoing precautions.
Storage Tips for Treatment Equipment and Products
Proper storage of treatment supplies ensures they remain effective whilst keeping them safely away from children and pets. The organisation also encourages ongoing prevention efforts by making supplies easily accessible.
Store pesticides in their original containers always. Child-resistant caps and warning labels remain important safety features. Keep pesticides in a locked cabinet or high shelf away from areas where children and pets can access them.
Diatomaceous earth should be kept in airtight containers to prevent moisture absorption. Damp DE loses effectiveness significantly. Store containers in dry areas like cupboards rather than under sinks where humidity accumulates.
Steam cleaners require proper drainage before storage. Empty all water from tanks and reservoirs to prevent mould growth. Wipe down exteriors with dry cloths. Store steam cleaners in utility cupboards where they stay dry and accessible.
Vacuum cleaners used for bed bug removal should be cleaned thoroughly before storage. Seal and dispose of bags or empty canisters outside immediately after use. Wipe down the vacuum exterior to remove any bugs that might have crawled onto it.
Keep mattress encasements in their original packaging if you’re storing spares. The packaging protects them from damage whilst keeping them dust-free. Store in clean, dry areas away from sharp objects that might tear them.
Create a dedicated bed bug prevention kit containing interceptors, diatomaceous earth, spare encasements, and treatment records. Label the storage container clearly. This organisation ensures you can respond quickly to any signs of re-infestation.
For comprehensive information on mattress cleaning equipment, including storage and maintenance tips, visit our guide to the best vacuum cleaners for mattress care. Proper equipment care extends its useful life significantly.
Successfully eliminating bed bugs teaches valuable lessons about preventing future infestations. These strategies protect your home going forward, especially important if you live in high-risk areas or travel frequently.
Inspect second-hand furniture thoroughly before bringing it inside. Check seams, joints, and undersides carefully. Many infestations start from used mattresses, sofas, or bed frames purchased cheaply. When in doubt, avoid items from unknown sources.
Hotel vigilance prevents travel-related introductions. Always inspect your hotel room before unpacking. Pull back bedding and check mattress seams immediately. Keep luggage on racks away from beds and walls. Never place bags on beds or floors.
Upon returning from travel, unpack directly into your washing machine if possible. Wash everything in hot water immediately. Inspect luggage carefully outside your home before bringing it inside. Consider storing luggage in garages or sheds rather than bedrooms.
Reduce bedroom clutter significantly. Cluttered rooms provide countless hiding places, making detection and treatment difficult. Minimalist bedrooms allow easier inspection and cleaning. Store clothing in sealed plastic containers rather than leaving items scattered around.
Regular mattress inspections catch problems early when they’re most manageable. Set a monthly reminder to examine your mattress thoroughly. Early detection prevents small introductions from becoming established infestations.
Maintain protective barriers like mattress encasements indefinitely. These provide ongoing insurance against future problems. The minimal inconvenience far outweighs potential infestation costs.
Conclusion On How To Get Rid Of Bed Bugs From a Mattress
Getting rid of bed bugs from a mattress demands patience, thoroughness, and multifaceted approaches. There’s no magic bullet, but combining heat treatment, vacuuming, encasements, and targeted chemical applications eliminates even stubborn infestations successfully.
Start immediately upon discovering bugs. Strip bedding, isolate your bed, and begin systematic treatment. Don’t let embarrassment delay action. Bed bugs spread rapidly when ignored. Early intervention makes elimination significantly easier.
Heat remains your most powerful weapon. Steam clean your mattress thoroughly, wash bedding in hot water, and use high-heat tumble drying. These methods kill bugs at all life stages without leaving chemical residues. Invest in quality steam cleaners for ongoing protection.
Mattress encasements provide essential defence by trapping surviving bugs whilst preventing new infestations. Leave them in place for at least 12-18 months. This single purchase often proves more effective than hundreds spent on other treatments.
Remember that successful elimination requires 4-6 weeks of consistent effort. Schedule multiple treatment cycles, monitor progress carefully, and maintain vigilance even after bugs disappear. Prevention strategies protect your home long-term.
For comprehensive mattress maintenance that includes bed bug prevention, check out our detailed guide to the best vacuum cleaners for mattress cleaning. Proper equipment makes ongoing prevention significantly easier.
You can defeat bed bugs without discarding your mattress or spending thousands on professional services. Follow these proven methods systematically. Your peaceful, bite-free sleep awaits on the other side of persistent effort.
Stay vigilant, act quickly, and trust the process. You’ve got this.
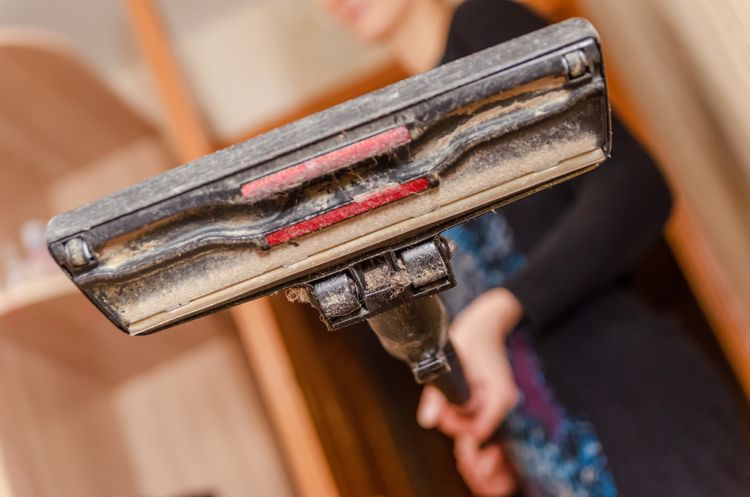
I’ll admit something embarrassing. I replaced my entire vacuum last year. Cost me $250. The problem? A clogged brush roll that I never cleaned properly. The motor burned out from strain. One conversation with a repair technician changed everything. He showed me the brush roll. Completely wrapped in hair and debris. He explained that learning how to clean vacuum cleaner brush properly extends vacuum life by years. Prevents motor strain. Maintains suction power. Reduces replacement costs dramatically.
I felt genuinely foolish. Thousands of pounds worth of vacuums over the years. Never once properly maintained the brush roll. Just replaced them when suction faded. The technician’s advice was simple. Clean the brush monthly. Your vacuum lasts twice as long.
I’ve now maintained brush rolls on three different vacuums for eighteen months. The difference genuinely shocks me. Suction stays consistent. Motors run quieter. No premature failures. The ten minutes monthly saves hundreds annually.
This guide shares everything I’ve learned about proper brush roll maintenance. The tools you actually need. The step-by-step process that works. Common mistakes that damage brushes. How often should you really clean them?
I’ll explain exactly what works through actual experience. No theoretical advice. Just practical techniques from someone who’s cleaned enough brush rolls to understand what matters. If you’re comparing vacuum options, check out our guide to the best upright vacuums for pet hair to find models with easier maintenance.
Let’s talk about keeping your vacuum’s brush roll properly clean.
Why Cleaning Your Vacuum Brush Matters
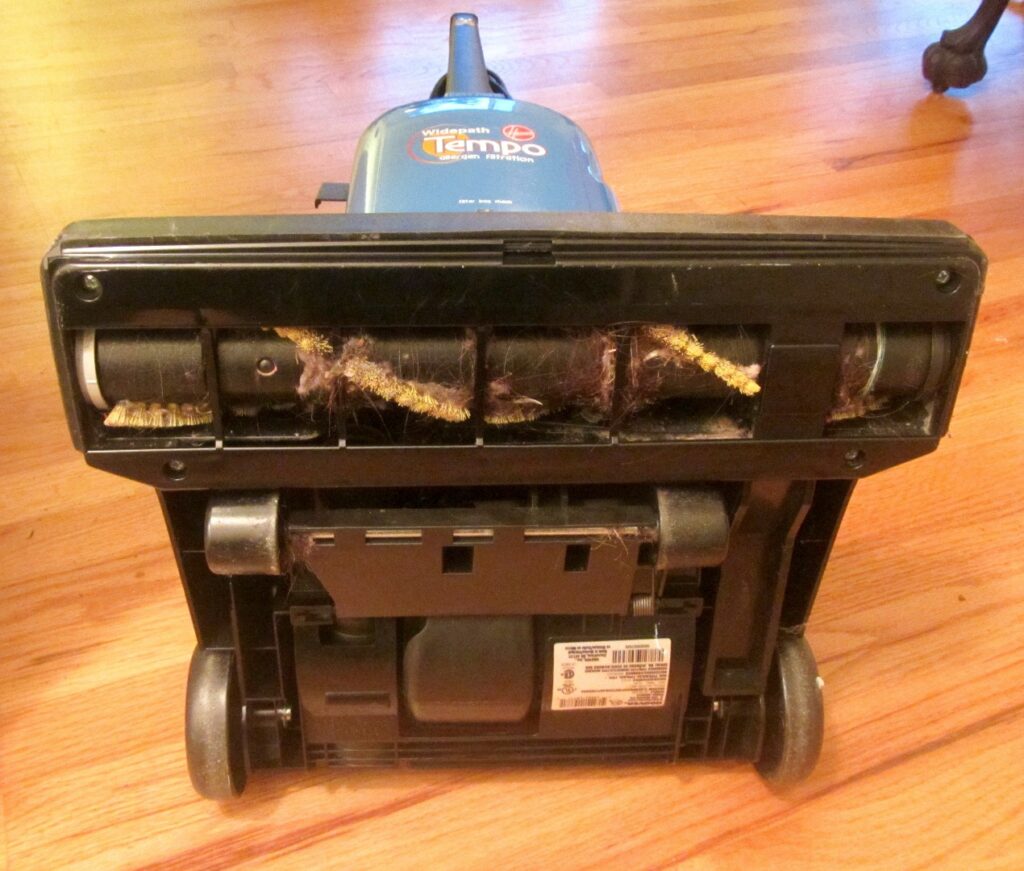
The brush roll does the heavy lifting literally. It agitates carpet fibres. Lifts embedded debris. Sweeps hard floors clean. When it’s clogged, everything suffers.
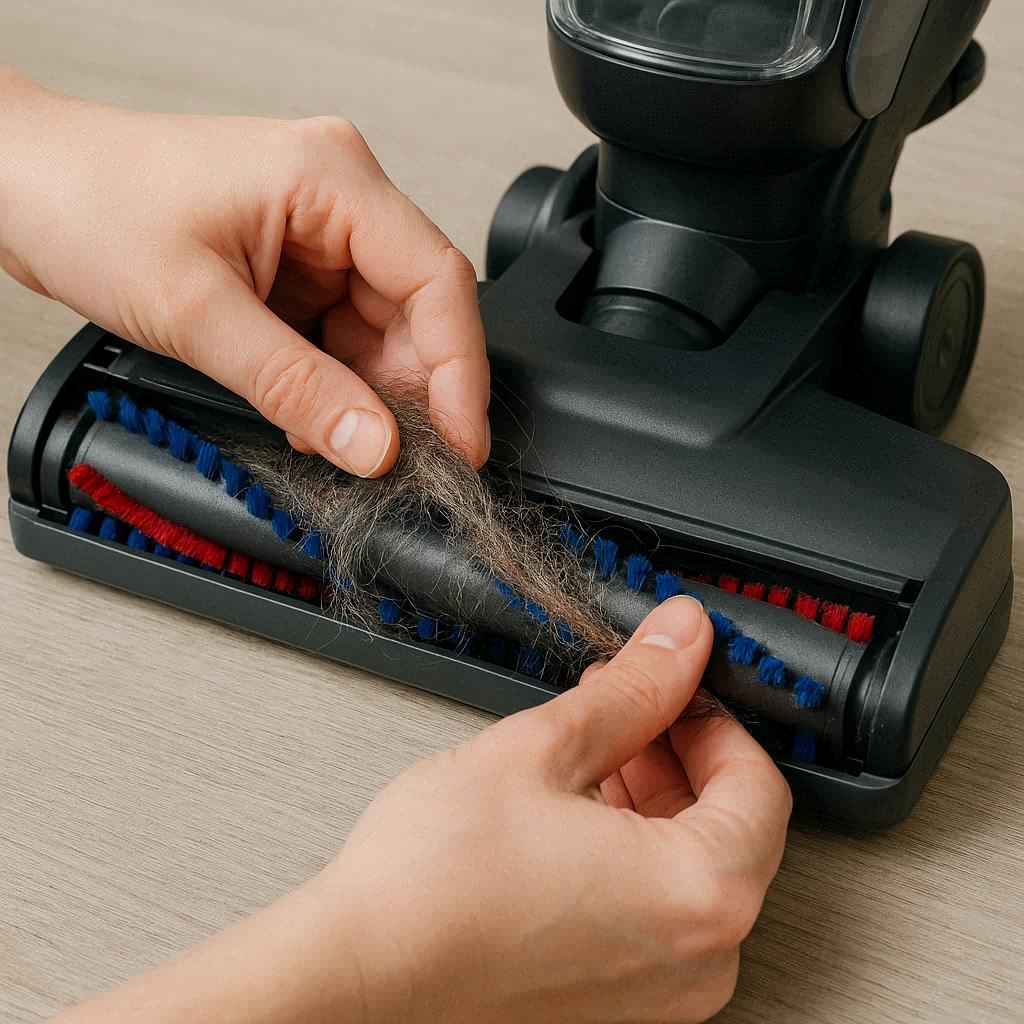
Hair wraps around the brush over time. Pet fur, human hair, carpet fibres all tangle. This creates resistance. The motor works harder. Suction decreases noticeably. Eventually, motors burn out from strain.
I ignored this for years. Wondered why vacuums died after two years. The answer was simple. Neglected brush maintenance. According to Dyson’s official maintenance guidelines, proper brush care extends vacuum life significantly.
Clean brushes maintain optimal performance. Suction stays strong. Cleaning becomes more efficient. Your vacuum actually picks up debris instead of pushing it around. The difference is genuinely noticeable.
Cost savings add up quickly. Replacement vacuums cost $100-$400. Replacement brush rolls cost $15-$40. Ten minutes of monthly maintenance versus hundreds in replacements. The maths makes sense.
Environmental benefits matter too. Fewer replaced vacuums means less waste. Extended appliance life reduces environmental impact. Simple maintenance becomes environmental responsibility.
Performance degradation happens gradually. You don’t notice daily. However, compare a clogged brush to a clean one. The difference shocks you. Cleaning efficiency improves dramatically with proper maintenance.
You don’t need fancy equipment. Basic household items work perfectly. I’ve tried expensive speciality tools. Standard scissors and basic supplies work better.
Sharp scissors or seam ripper cut through tangled hair easily. I prefer small embroidery scissors. The pointed tips reach tight spaces. Large scissors feel clumsy.
An old toothbrush or stiff-bristle brush removes stubborn debris. The bristles dislodge compacted dirt. I keep a dedicated toothbrush for this purpose. Don’t use your actual toothbrush obviously.
Microfibre cloth wipes the brush housing clean. Removes dust and grime. Any clean cloth works. Microfibre just grabs debris better.
Mild dish soap diluted in warm water cuts through grease. Hair contains natural oils. Soap removes the residue. Just a few drops suffice.
Optional but helpful items include tweezers for stubborn tangles. Compressed air blasts debris from tight crevices. Rubber gloves keep your hands clean during the process.
Budget-friendly options work perfectly. You probably own everything needed already. Total investment? Perhaps $5 if you need scissors. Most supplies live in your kitchen already.
I’ve tested expensive vacuum maintenance kits. Honestly, they’re unnecessary. Basic household items accomplish everything needed. Save your money for actual vacuum purchases.
Step-by-Step Brush Cleaning Process
Preparation and Safety
Unplug the vacuum first. Always. This prevents accidental starts. Safety matters more than convenience. I learned this after a frightening close call.
Find a well-lit workspace. Good lighting helps you see tangled debris. I use my kitchen table. The bright overhead light shows everything clearly.
Lay down newspaper or old towels. Brush cleaning gets messy. Hair and debris scatter everywhere. Protection saves cleanup time afterwards.
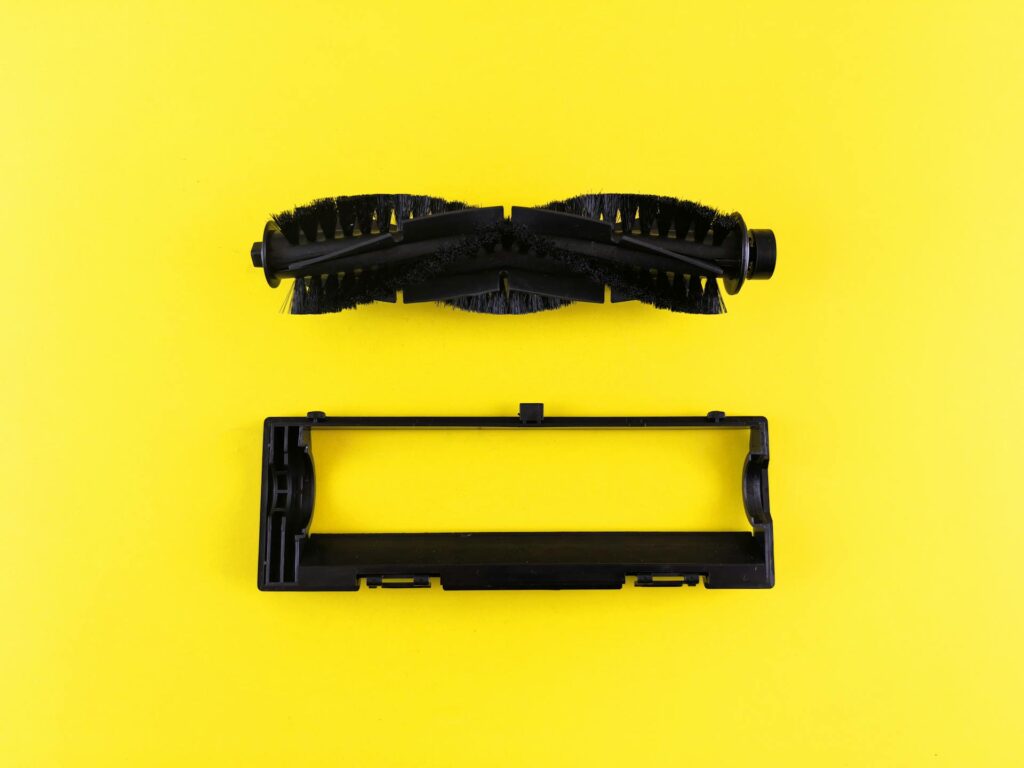
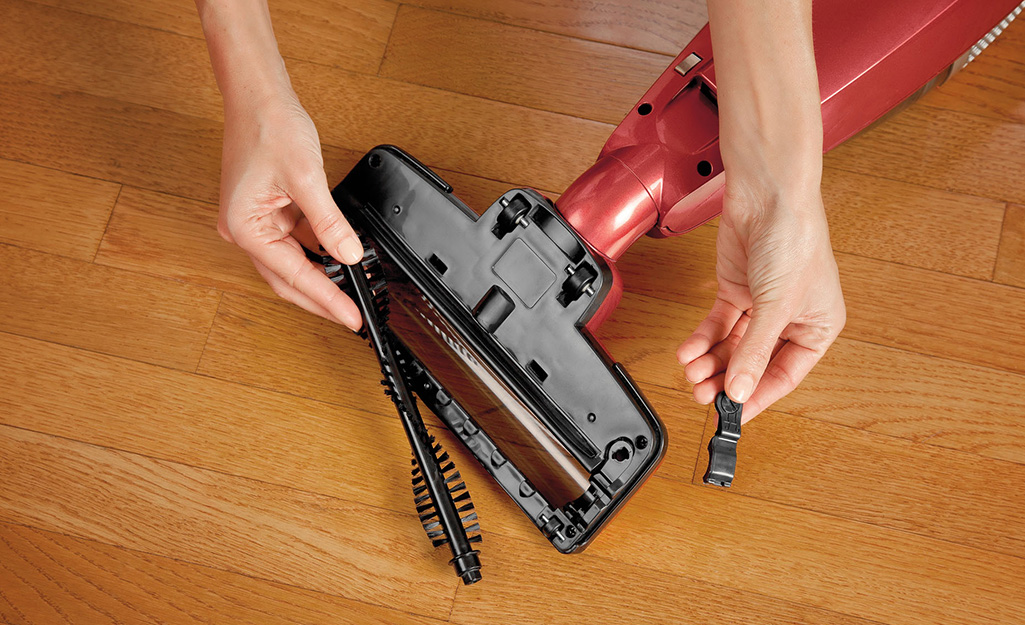
Remove the brush roll from the vacuum. Each model differs slightly. Check your manual for specific instructions. Most feature simple clip mechanisms or screws.
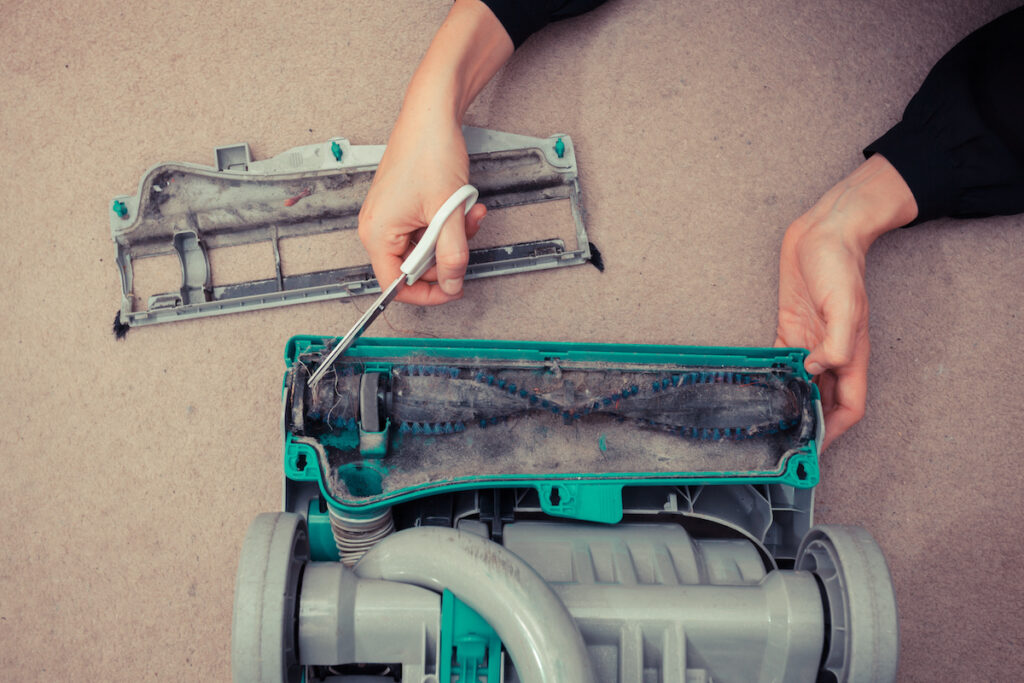
Removing Hair and Debris
Cut through hair tangles carefully with scissors. Slide the blade under wrapped hair. Cut along the brush length. The hair falls away easily.
Work systematically from one end to the other. Don’t rush. Careful cutting prevents brush damage. I’ve accidentally cut bristles before. Learn from my mistakes.
Pull away loosened hair with your fingers. Large clumps come away easily once cut. Smaller tangles require tweezers. Patience matters here.
Use the old toothbrush for stubborn debris. Scrub the bristles firmly. Compacted dirt loosens with persistent scrubbing. The brush bristles dislodge everything effectively.
According to the Carpet and Rug Institute, regular brush maintenance prevents carpet damage. Clean brushes protect your flooring investment too.
Deep Cleaning the Brush Roll
Fill a basin with warm water and mild soap. Just enough to submerge the brush roll. A few drops of dish soap suffice.
Submerge the brush roll completely. Let it soak for ten minutes. This loosens stubborn grime. Oil residue from hair dissolves in soapy water.
Scrub the brush roll with the toothbrush. Work the bristles thoroughly. Pay attention to the ends where debris accumulates. Rinse under running water until clean.
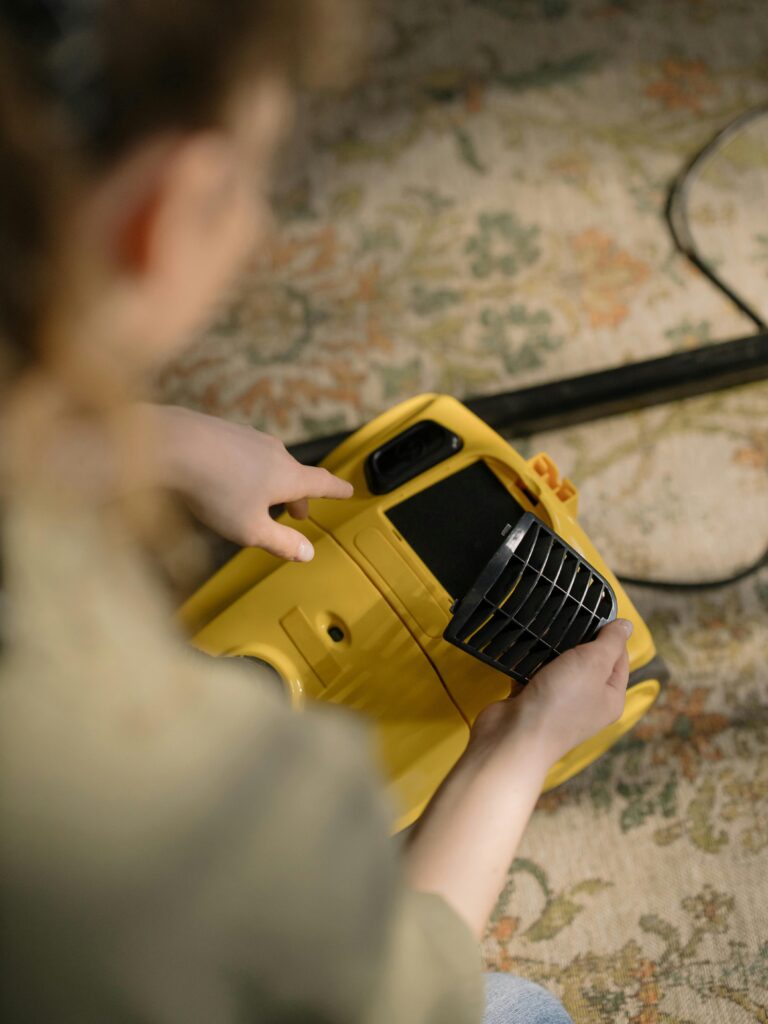
Inspect the brush housing whilst the roll soaks. Wipe it clean with a damp microfibre cloth. Dust and debris accumulate here too. Clean housing improves overall performance.
Drying and Reassembly
Shake excess water from the brush roll. Pat dry with clean towels. Air dry completely for several hours. I usually clean mine in the evening. Let it dry overnight.
Never reinstall a damp brush roll. Moisture damages motors. Promotes mould growth. Complete drying prevents these problems. Patience matters here.
Check that the brush spins freely once dry. No resistance or wobbling. Smooth rotation indicates proper cleaning. Resistance suggests remaining debris.
Reinstall the brush roll according to your vacuum’s instructions. Ensure it clicks or screws securely. Test the vacuum briefly to confirm proper installation.
How Often You Should Clean Your Brush
Monthly cleaning suits most households. This frequency prevents excessive buildup. Maintains consistent performance. I mark my calendar monthly for this task.
Pet owners need more frequent cleaning. Hair accumulates faster with shedding animals. I clean my brush bi-weekly now. Two cats produce impressive hair volumes.
High-traffic homes with multiple people benefit from bi-weekly cleaning. More foot traffic means more debris. Adjust frequency based on actual accumulation.
Signs you need immediate cleaning include reduced suction power. Strange burning smells indicate motor strain. Visible hair wraps around the brush. These signal urgent maintenance needs.
Low-use situations might stretch to every six weeks. However, monthly remains safest. The time investment is minimal. Prevention beats emergency repairs.
Seasonal adjustments help too. Autumn leaves track inside more. Spring shedding season increases pet hair. Increase cleaning frequency during high-debris seasons.
If you’re using one of the best cordless vacuums with self-cleaning brushes, you’ll still need occasional manual cleaning. Self-cleaning reduces frequency but doesn’t eliminate the need.
Common Mistakes to Avoid
Never cut brush bristles accidentally. This permanently damages cleaning effectiveness. Careful, deliberate cutting prevents this. I’ve ruined brushes through carelessness.
Never skip the housing cleaning. Debris accumulates there too. Affects overall performance. Clean housing improves airflow and efficiency.
Don’t ignore unusual resistance when reinstalling. This indicates improper installation. Or remaining debris. Check carefully before powering on.
Avoid cleaning too infrequently. Excessive buildup becomes harder to remove. Monthly prevention beats quarterly emergency cleaning. Consistent maintenance saves time overall.
Dealing with Stubborn Hair Tangles
Severely tangled hair requires a systematic approach. Start at the brush ends. Work towards the centre. This prevents pushing tangles tighter.
Use a seam ripper for extremely tight tangles. The sharp hook slides under the hair easily. Cuts through multiple layers efficiently. I prefer this over scissors for bad tangles.
Soak stubborn areas longer. Twenty minutes in warm, soapy water. This softens hair and oils. Makes removal significantly easier afterwards.
Cut in sections rather than attempting one continuous cut. Small sections come away easily. Large sections often tangle worse. Patience prevents frustration.
Check the belt condition whilst cleaning severely tangled brushes. Excessive resistance can damage belts. Replace if you notice cracks or looseness.
Prevention helps more than cure. More frequent cleaning prevents severe tangles from developing. Monthly maintenance keeps tangles manageable. I learned this through several frustrating experiences.
Maintaining Different Brush Types
Standard rotating brushes need monthly deep cleaning. The process outlined above works perfectly. These are the most common brush types.
Self-cleaning brush rolls still need occasional attention. The anti-tangle design reduces buildup. However, it doesn’t eliminate it completely. Check it quarterly at a minimum.
Soft roller brushes for hard floors require gentler handling. Don’t submerge electronic components. Wipe with a damp cloth instead. These need different care.
Dual brush systems mean double the work. Clean both brushes thoroughly. One clogged brush reduces overall effectiveness. I have a vacuum with dual brushes. Takes twenty minutes monthly.
Motorised pet tools count as brushes too. Apply the same cleaning principles. These accumulate hair quickly. Clean them alongside the main brushes.
Bristles worn down to nubs indicate replacement time. Effective cleaning requires proper bristle length. Worn brushes push debris instead of lifting it.
Bent or misshapen brush rolls affect performance. The brush should spin perfectly straight. Wobbling indicates structural damage. Replace rather than risk motor damage.
Cracked plastic components compromise durability. Small cracks spread over time. Eventually, the brush fails completely. Replace at the first sign of cracking.
Persistent odours despite thorough cleaning suggest deep contamination. Some materials absorb odours permanently. Replacement becomes necessary for freshness.
Inconsistent performance after cleaning indicates worn components. The brush should restore full suction when clean. Continued poor performance means replacement time.
Cost comparison helps decide. Replacement brush rolls cost $15-$40. New vacuums cost $100-$400. Replacing brushes makes economic sense. However, severely damaged brushes warrant full vacuum replacement consideration.
According to the Environmental Protection Agency, proper maintenance extends appliance life significantly. Replace components before they damage motors.
Storage and Between-Cleaning Care
Store spare clean brush rolls if possible. Having a backup allows immediate replacement. I keep one spare for emergency situations. Rotate them monthly.
Keep removed brushes in clean, dry locations. Moisture promotes mould. Dust accumulation defeats the cleaning purpose. I use sealed plastic bags.
Check brushes visually weekly. Just a quick glance whilst vacuuming. Catch excessive buildup early. This prevents emergency deep cleaning sessions.
Remove large debris immediately after vacuuming. Those visible hair clumps. Removing them fresh prevents tight tangling. Takes thirty seconds. Saves ten minutes monthly.
Wipe the brush housing after each use. Quick wipe with a dry cloth. Prevents dust accumulation. Maintains optimal airflow. This simple habit improves performance.
Store cleaning tools together. Scissors, toothbrush, and cloths all in one location. I keep mine under the kitchen sink. Easy access encourages regular maintenance.
Label your cleaning supplies if you share them. Prevents confusion with other household items. Dedicated vacuum maintenance tools stay organised.
Cost Savings from Regular Maintenance
I’ve saved approximately $600 over eighteen months. Three vacuums would have died without proper brush maintenance. One has lasted instead. The numbers speak clearly.
Replacement brushes cost $15-$40 every two years. Full vacuum replacements cost $100-$400 every two years previously. The savings are substantial.
Extended motor life reduces repair costs. Motors strained by clogged brushes fail prematurely. Clean brushes prevent this damage. No expensive motor replacements needed.
Improved efficiency reduces electricity usage. Clogged vacuums run longer for the same results. Clean brushes finish faster. Lower energy bills accumulate over time.
Prevention beats emergency repairs always. Emergency brush replacements cost more. Rushed purchases mean poor choices. Regular maintenance prevents desperate situations.
Budget-conscious buyers benefit most. If you purchased one of the best budget upright vacuums, proper maintenance maximises your investment. Extends the affordable vacuum life significantly.
Calculate your potential savings. Previous vacuum lifespan times replacement cost. Compare against the maintenance time investment. The maths strongly favours regular cleaning.
Environmental Impact of Proper Maintenance
Fewer replaced vacuums mean less landfill waste. Electronic waste harms the environment significantly. Extended appliance life reduces your environmental footprint.
Manufacturing new vacuums requires substantial resources. Raw materials, energy, and transportation all create emissions. Maintaining existing vacuums reduces these impacts.
Proper disposal of cleaning waste matters too. Hair and debris go in regular rubbish. Don’t flush them down toilets. Blocked plumbing causes bigger environmental problems.
Reduced energy consumption helps too. Clean brushes work efficiently. Less runtime means lower electricity use. Small savings multiply across millions of households.
Extended product life supports circular economy principles. Use products longer. Replace them less frequently. This approach benefits everyone environmentally.
Choose eco-friendly cleaning products. Biodegradable dish soap works perfectly. Avoid harsh chemicals unnecessarily. Environmental responsibility extends to maintenance products too.
If a brush won’t spin after cleaning, it suggests improper installation. Remove and reinstall carefully. Check for debris blocking rotation. Ensure the belt sits correctly.
Continued poor suction despite a clean brush indicates other issues. Check filters and hoses. Clogged filters reduce suction significantly. Clean brushes alone don’t solve everything.
Strange noises after reinstalling mean something’s wrong. Stop immediately. Check for loose components. Tighten screws properly. Unusual sounds indicate problems.
Brush spins but doesn’t touch the floor, needs height adjustment. Most vacuums feature adjustable settings. Lower the setting until the brush contacts the surfaces.
Excessive vibration after cleaning suggests an unbalanced brush. Hair stuck inside the brush roll housing. Remove and inspect carefully. Balance matters for smooth operation.
A burning smell despite a clean brush warrants professional inspection. This might indicate motor damage. Don’t ignore burning odours. Seek repair advice immediately.
Professional Cleaning Services
Some vacuum repair shops offer professional brush cleaning. Costs around $15-$25 typically. Useful for severely neglected brushes. However, DIY saves money.
Annual professional servicing includes brush maintenance. Costs $40-$60 for a full vacuum service. Worth considering for expensive vacuums. I do this for my Dyson annually.
Some manufacturers offer cleaning services. Check warranty terms. Some include annual maintenance. Take advantage of the included services.
Professional cleaning makes sense for complex brush systems. Dual motor brushes or complicated mechanisms. DIY might risk damage. Professional expertise prevents problems.
However, basic brush maintenance doesn’t require professionals. The process is straightforward. You’ll develop confidence quickly. Save professional services for genuine complications.
Balance cost versus convenience. Professional cleaning costs $15-$25. Your time costs something too. Calculate what makes sense personally.
Conclusion
Learning how to clean vacuum cleaner brush properly transformed my vacuum ownership experience. Eighteen months of consistent maintenance. Three vacuums are still running perfectly. No premature failures. No expensive replacements.
The process takes ten minutes monthly. Basic household supplies. Simple, straightforward techniques. Anyone can do this successfully with no special skills required.
The benefits justify the effort completely. Extended vacuum life. Maintained suction power. Reduced replacement costs. Lower environmental impact. Better cleaning results.
I genuinely wish someone had explained this years earlier. Thousands of pounds wasted on premature vacuum replacements. All are preventable through simple monthly maintenance. The frustration was unnecessary.
Monthly cleaning prevents severe tangles. Maintains optimal performance. Reduces motor strain. Your vacuum lasts years longer. The investment pays dividends immediately.
Start small if you’re hesitant. Set a monthly reminder. Gather your supplies. Follow the steps outlined above. You’ll appreciate the results after the first cleaning.
For more options and detailed comparisons, visit our complete guide to the best upright vacuums for pet hair. Proper vacuum cleaner brush maintenance maximises any vacuum’s potential. Your cleaned brush will transform performance immediately. Start this month. Your vacuum will thank you.
Discover The Secrets To Restoring Suction Power & Extending Your Vacuum’s Lifespan
There’s something profoundly frustrating about vacuuming your floors whilst noticing the suction feels weaker than it did last month. You’re pushing harder, making multiple passes over the same spot, and wondering whether your vacuum’s simply given up on life. Before you consider replacing the entire unit, I’ve got news that’ll save you hundreds of pounds. The culprit behind your vacuum’s lacklustre performance is almost certainly a clogged, dirty filter desperately crying out for attention. Learning how to clean a vacuum cleaner filter represents one of the most important maintenance tasks you’ll ever perform on your cleaning equipment.
Yet surprisingly, most people completely ignore their filters until suction becomes virtually non-existent. I’ve watched friends spend $300-500 on replacement vacuums when a simple fifteen-minute filter cleaning would have restored performance completely. It’s genuinely painful to witness.
What drew me to write this comprehensive guide was discovering how many misconceptions surround filter maintenance. Some people believe filters last forever without cleaning. Others think all filters are disposable and require constant replacement. The reality sits somewhere between these extremes, depending on your specific vacuum type and filter design. Understanding proper filter cleaning techniques dramatically extends your vacuum’s lifespan while maintaining optimal suction power and air quality.
The benefits of regular filter cleaning extend beyond just restored suction. Clean filters improve indoor air quality by effectively capturing allergens and dust particles. They reduce energy consumption by allowing your vacuum’s motor to operate efficiently. They prevent expensive repairs caused by motor strain from restricted airflow. Most importantly, they save money by eliminating premature vacuum replacement. If you’re looking to invest in a quality vacuum that’s worth maintaining properly, check out our guide to the best vacuum cleaners to find models with excellent filtration systems.
I’ve spent years maintaining various vacuum types across different households. I’ve cleaned washable filters, replaced disposable ones, and learned through trial and error which methods actually work versus those creating more problems. This guide represents genuine practical experience rather than theoretical advice. I’ll share what genuinely works for restoring filter performance, what mistakes to avoid, and how to determine whether your filter needs cleaning or replacement.
Before diving into cleaning techniques, you need to understand what type of filter your vacuum uses. Different filter designs require dramatically different maintenance approaches. Using the wrong cleaning method can permanently damage certain filters whilst proving ineffective on others.
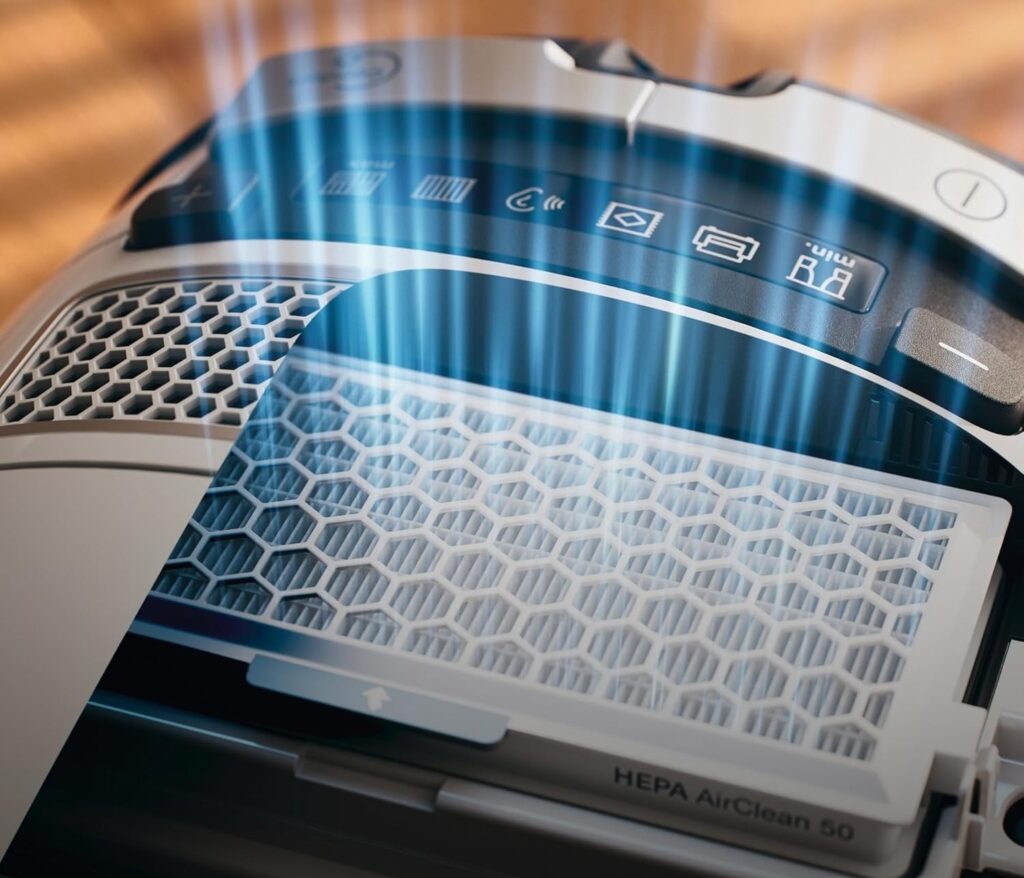
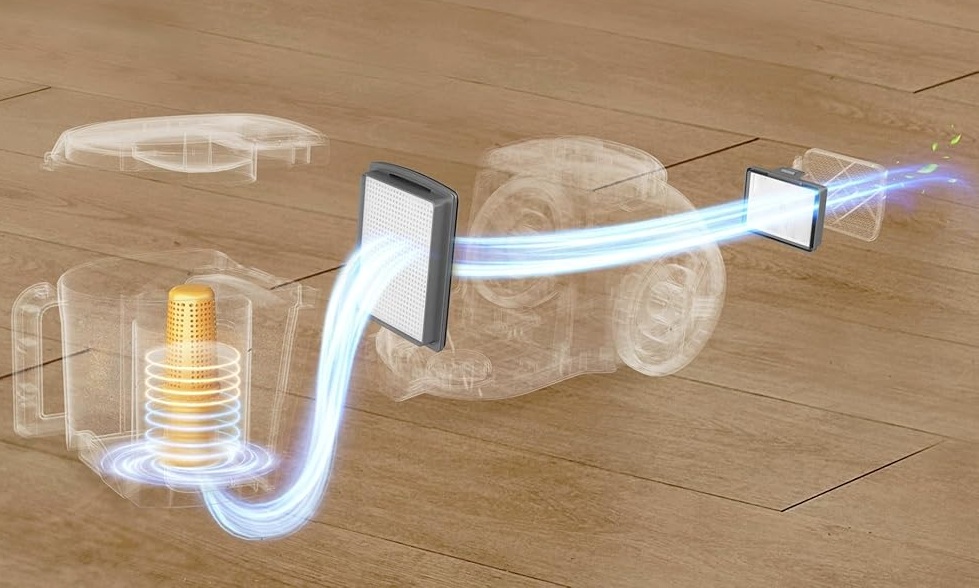
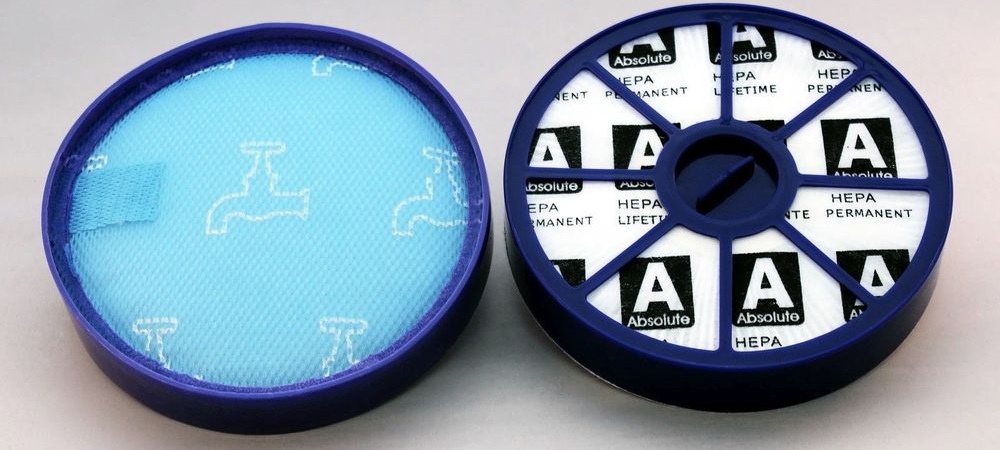
HEPA filters represent the gold standard for allergen capture. These high-efficiency particulate air filters trap 99.97% of particles down to 0.3 microns. Some HEPA filters are washable, whilst others are strictly disposable. Check your manufacturer’s documentation before attempting any cleaning. Washable HEPA filters typically feature rigid plastic frames with pleated filter media. Disposable HEPA filters often use cardboard frames that would disintegrate when wet.
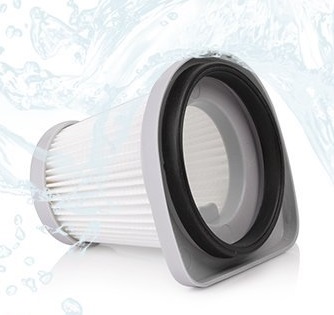
Foam filters are almost universally washable and extremely durable. These sponge-like filters capture larger particles and protect the motor from debris. Cordless stick vacuums frequently use foam pre-filters combined with other filter types. The foam material withstands repeated washing without degradation. Simply rinse under running water until the water runs clear.
Felt or cloth filters sit between foam and HEPA in terms of filtration efficiency. Most felt filters are washable, though some cheaper versions are disposable. The fabric construction captures medium-sized particles effectively. These filters benefit from gentle hand washing rather than aggressive scrubbing that might damage the fibres.
Cartridge filters feature pleated paper or synthetic material, maximising surface area for particle capture. Many cartridge filters are washable despite their paper-like appearance. However, some use genuine paper that would be destroyed by water. Again, manufacturer guidance proves essential. According to the Environmental Protection Agency, proper filter maintenance significantly impacts indoor air quality and vacuum performance.
Understanding your specific filter type before attempting cleaning prevents expensive mistakes. Consult your vacuum’s user manual or check the manufacturer’s website for definitive guidance. When in doubt, err on the side of caution and contact customer service for clarification.
Benefits of Regular Filter Cleaning
The advantages of maintaining clean vacuum filters extend far beyond restored suction power. Regular filter cleaning delivers multiple benefits affecting your vacuum’s performance, your home’s air quality, and your wallet’s health. Understanding these benefits motivates consistent maintenance rather than neglect until performance becomes unacceptable.
Restored suction power represents the most immediately noticeable benefit. Clogged filters restrict airflow dramatically, forcing your vacuum’s motor to work harder whilst delivering weaker cleaning performance. A properly cleaned filter restores suction to near-original levels within minutes. The difference proves genuinely shocking when you’ve adapted to a gradually declining performance over months.
Improved indoor air quality benefits everyone, particularly those with allergies or asthma. Dirty filters become saturated with captured particles, reducing their effectiveness at trapping additional allergens. Some particles may even blow back into your home’s air. Clean filters maintain optimal particle capture, preventing allergen recirculation. For households with pets or allergy sufferers, this benefit alone justifies regular maintenance.
An extended vacuum lifespan saves substantial money over time. Motors forced to operate against restricted airflow experience increased wear and heat buildup. This stress shortens motor life significantly, leading to premature vacuum failure. Clean filters allow proper airflow, reducing motor strain and extending overall vacuum lifespan by years. The fifteen minutes spent cleaning filters can literally add years to your vacuum’s service life.
Reduced energy consumption lowers your electricity bills whilst benefiting the environment. Vacuums with clogged filters consume more power attempting to maintain suction through restricted airways. Clean filters allow efficient motor operation at lower power levels. The savings per cleaning session prove minimal, but they compound over hundreds of uses throughout your vacuum’s lifetime.
Prevention of expensive repairs represents another significant advantage. Overheating motors caused by restricted airflow can fail catastrophically, requiring professional repair or complete replacement. Regular filter cleaning prevents this scenario entirely. The cost of replacement filters or cleaning supplies pales compared to motor repair bills ranging from $100-300.
Versatility of Filter Cleaning Methods
The beauty of filter maintenance lies in its adaptability to different filter types, vacuum models, and available resources. Multiple cleaning approaches exist, allowing you to choose methods that match your specific situation. Understanding this versatility ensures you can maintain your vacuum regardless of circumstances.
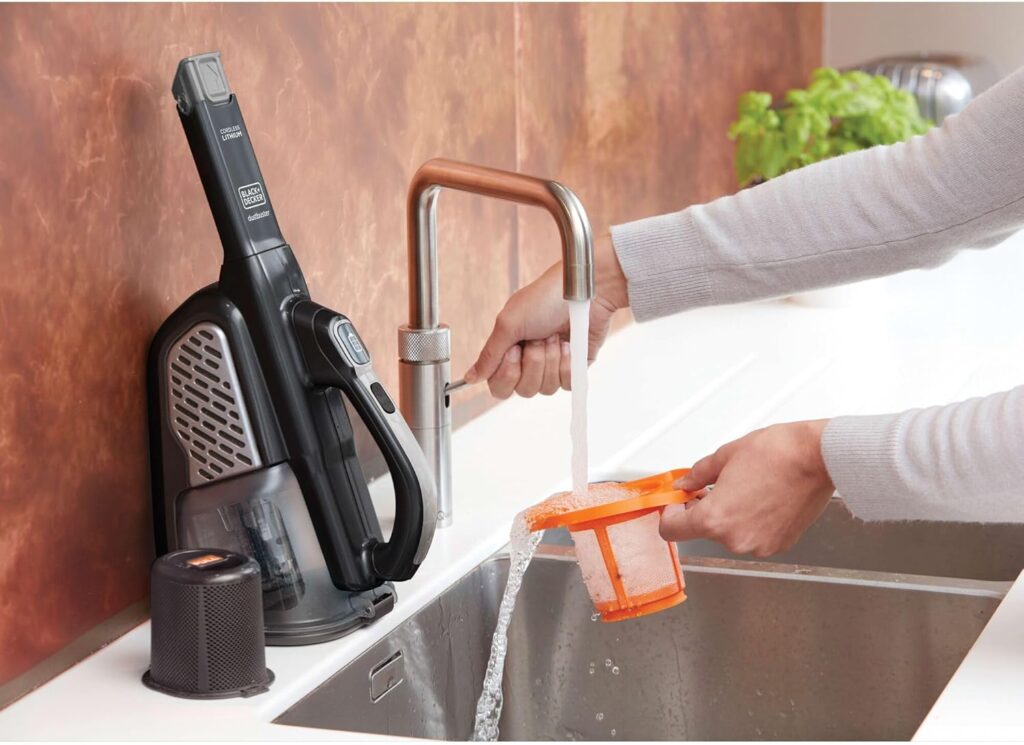
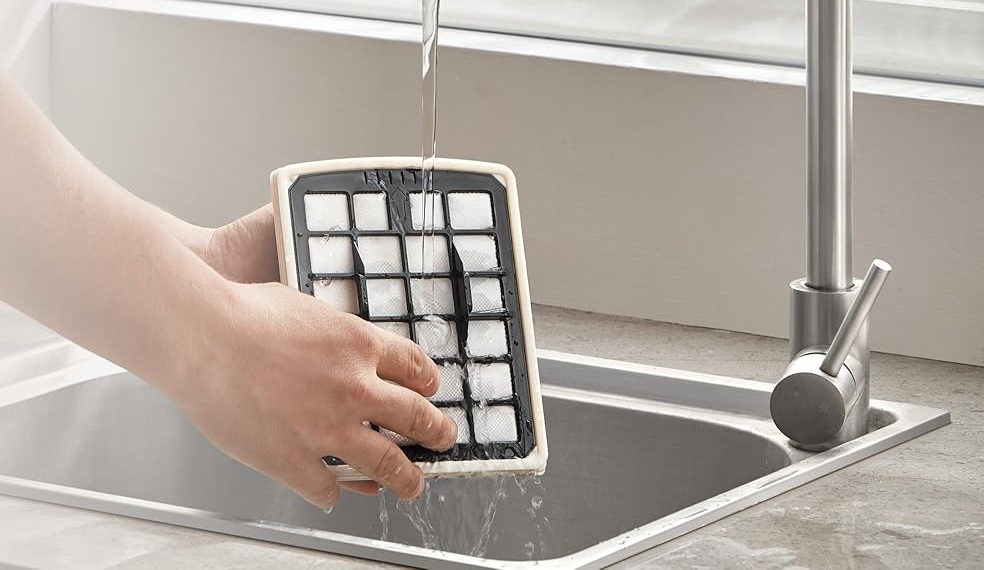
Rinse-and-dry methods work brilliantly for washable filters. Simply hold the filter under running water until the water runs clear. Gently squeeze foam filters to expel trapped dirt without twisting or wringing. Allow complete drying for 24-48 hours before reinstalling. This approach costs nothing beyond water and requires minimal time investment.
Compressed air cleaning suits have filters that shouldn’t get wet. Many vacuum shops and garages provide compressed air access. Blow air through the filter from the clean side, forcing debris out the dirty side. This method proves effective for pre-motor filters and some HEPA designs. The technique works outdoors to avoid redistributing dust indoors.
Soft brush cleaning removes surface debris without water. Use a soft-bristled brush, gently removing visible dust and debris from filter surfaces. This approach works well for monthly maintenance between deeper cleanings. The method proves particularly useful for filters requiring infrequent washing to preserve their effectiveness.
Vacuum-to-vacuum cleaning sounds circular, but it works surprisingly well. Use a second vacuum with a brush attachment, gently removing debris from your primary vacuum’s filter. This technique suits filters between full cleanings, extending intervals between washings. The approach proves convenient when you lack time for complete filter drying.
Replacement represents the ultimate cleaning method for disposable filters. Some filters simply aren’t designed for washing and require periodic replacement. Follow manufacturer recommendations for replacement intervals. Whilst this approach costs more, it ensures optimal filtration performance. Budget approximately $10-30 annually for replacement filters, depending on your vacuum model. If you’re considering upgrading to a vacuum with better filter maintenance options, see our comprehensive comparison in our best vacuum cleaners for pet hair guide.
Environmental Considerations
Filter maintenance decisions impact environmental sustainability more than most people realise. Choosing between washable and disposable filters, selecting cleaning products, and managing filter disposal all carry environmental consequences. Making informed choices reduces your ecological footprint whilst maintaining cleaning effectiveness.
Washable filters dramatically reduce landfill waste compared to disposable alternatives. A single washable filter lasting 3-5 years replaces dozens of disposable filters otherwise destined for landfills. The manufacturing energy required for replacement filters compounds this environmental impact. Choosing vacuum models with washable filters represents an eco-conscious purchasing decision.
Water consumption during filter cleaning remains relatively minimal. Thorough filter rinsing typically uses 2-5 litres of water. This consumption pales compared to other household water use, like showering or dishwashing. However, collecting rinse water for garden use where appropriate maximises water efficiency. The dirty water contains organic matter beneficial for certain plants.
Cleaning product selection affects environmental impact significantly. Plain water proves sufficient for most filter cleaning without requiring chemical cleaners. When cleaning products become necessary for stubborn buildup, choose environmentally friendly, biodegradable options. Harsh chemicals aren’t required for effective filter cleaning and introduce unnecessary environmental harm.
Proper disposal of genuinely worn-out filters matters environmentally. Some filters contain materials requiring special disposal consideration. Check local recycling programmes accepting vacuum filters. Many councils now accept small appliance components through specific recycling streams. When recycling proves impossible, at least ensure proper general waste disposal rather than littering.
Energy efficiency improvements from clean filters reduce your carbon footprint indirectly. Vacuums operating efficiently consume less electricity, reducing fossil fuel consumption at power plants. This indirect benefit compounds over your vacuum’s lifetime. The cumulative energy savings from regular filter maintenance prove surprisingly substantial.
Extending vacuum lifespan through proper maintenance represents perhaps the most significant environmental benefit. Manufacturing new vacuums consumes substantial resources, including plastics, metals, and energy. Each additional year you extract from your current vacuum delays resource consumption for replacement manufacturing. This longevity proves far more environmentally beneficial than any single maintenance decision.
Impact on Vacuum Noise Levels
The relationship between filter cleanliness and vacuum noise levels surprises most people. Dirty filters don’t just reduce suction—they dramatically increase operating noise through multiple mechanisms. Understanding this connection helps diagnose filter problems through audio cues alone.
Clogged filters force motors to work harder, generating increased mechanical noise. The motor spins faster, attempting to maintain suction against restricted airflow. This increased RPM produces higher-pitched, more intense motor sounds. The noise difference between clean and clogged filters can exceed 10-15 decibels, representing a substantial audible increase.
Airflow turbulence creates whistling or whining sounds when filters become partially blocked. Air forced through restricted passages generates high-frequency noise similar to wind through gaps. These sounds indicate airflow obstruction requiring immediate filter attention. The whistling typically worsens as blockage severity increases.
Vibration amplification occurs when unbalanced airflow causes components to resonate. Dirty filters create uneven air pressure throughout the vacuum’s internal pathways. This imbalance causes housing components to vibrate at frequencies they wouldn’t experience with clean filters. The resulting rattling or buzzing adds to the overall noise levels.
Motor strain from restricted airflow shortens bearing life, eventually causing grinding noises. Bearings operating under excessive load wear prematurely. This wear manifests as grinding, squealing, or groaning sounds during operation. By the time these sounds appear, motor damage may already be substantial. Regular filter cleaning prevents this progressive deterioration.
Reduced noise levels from clean filters improve user experience substantially. Quieter operation makes vacuuming less unpleasant, potentially encouraging more frequent cleaning. The noise reduction benefits households with young children, pets, or noise-sensitive individuals. Maintaining clean filters proves especially important for early morning or late evening cleaning sessions.
Testing filter cleanliness through audio cues provides a convenient diagnostic tool. If your vacuum sounds noticeably louder than remembered, check the filters before assuming motor problems. The sound change often precedes obvious suction loss, allowing proactive maintenance. Trust your ears, they provide a reliable early warning of filter issues.
Different vacuum manufacturers provide varying guidance for filter maintenance. Understanding brand-specific recommendations ensures you maintain your vacuum according to the manufacturer’s engineering specifications. Following these guidelines protects warranty coverage whilst optimising performance.
Dyson emphasises washable filter maintenance across their cordless stick vacuum range. Their guidance recommends monthly filter washing under cold running water without detergent. They specifically warn against dishwasher cleaning or tumble drying, which would damage filter components. Dyson filters require complete drying for 24 hours before reinstallation. Their newer models feature reminder notifications through digital displays.
Shark provides detailed filter maintenance guidance varying by model series. Their upright vacuums typically use foam and felt filters, requiring monthly washing. Shark recommends gentle hand washing with warm water and mild soap. Their robotic vacuums feature different maintenance schedules with filters needing replacement every 3-6 months, depending on usage. According to Shark’s official maintenance documentation, proper filter care extends vacuum lifespan significantly.
Miele takes a premium approach with mostly disposable filters requiring annual replacement. Their HEPA filters are specifically designed as disposable components, ensuring optimal filtration. Miele argues that washing HEPA filters degrades filtration efficiency below acceptable standards. They recommend filter replacement as preventive maintenance rather than waiting for performance degradation.
Hoover’s guidance varies dramatically between budget and premium models. Budget uprights often feature basic foam filters requiring frequent washing. Premium models may include genuine HEPA filters with longer replacement intervals. Hoover emphasises checking model-specific documentation rather than assuming universal maintenance procedures.
Bissell provides practical, user-friendly maintenance guidance across their product range. They clearly identify washable versus disposable filters in product documentation. Bissell’s wet-dry vacuums require especially vigilant filter maintenance given their demanding operating conditions. Their guidance emphasises complete filter drying before storage, preventing mould growth.
Budget-Friendly Filter Maintenance
Filter maintenance needn’t strain your budget. Multiple cost-effective approaches maintain optimal vacuum performance without expensive products or frequent filter replacement. Understanding these budget-friendly options ensures consistent maintenance regardless of financial constraints.
Plain water represents the most economical cleaning solution for washable filters. Thorough rinsing under running water removes the majority of trapped dirt and debris. No special cleaning products are required for routine maintenance. The cost amounts to literally pennies in water charges, making this approach accessible to everyone.
Homemade cleaning solutions work excellently for stubborn filter buildup. Mix mild dish soap with warm water, creating a gentle cleaning solution. Soak filters for 10-15 minutes, loosening embedded dirt. Rinse thoroughly, ensuring no soap residue remains. This approach costs perhaps 5-10 pence per cleaning session whilst delivering professional results.
Preventive maintenance reduces overall filter replacement costs. Emptying dustbins before reaching capacity prevents excessive filter loading. Using pre-motor filters where available protects the main filters from heavy debris. These simple habits extend filter lifespan substantially without additional expense.
Generic replacement filters offer significant savings over branded alternatives. Many third-party manufacturers produce compatible filters for popular vacuum models. These alternatives typically cost 40-60% less than original equipment filters whilst delivering comparable performance. Ensure compatibility before purchasing to avoid fitment issues.
Filter cleaning tools require minimal investment. A soft brush costing $2-3 lasts for years whilst enabling effective filter maintenance. Compressed air cans cost $5-8 and provide dozens of cleaning sessions. These one-time investments deliver ongoing value through extended filter life.
Extending filter lifespan through proper care maximises value. Allowing complete drying prevents mould, requiring premature replacement. Gentle handling avoids tears or damage necessitating disposal. Storing filters properly between uses maintains their condition. These practices cost nothing whilst substantially extending filter service life. For vacuums with excellent filter longevity and easy maintenance, explore our recommendations in our best cordless vacuum cleaners guide.
Proper Maintenance Procedures
Understanding correct filter cleaning procedures ensures effective maintenance without damage. Following these step-by-step guidelines delivers optimal results whilst protecting your vacuum’s filtration system. The process varies slightly depending on filter type but follows general principles.
Begin by consulting your vacuum’s user manual for specific guidance. Manufacturers provide detailed instructions tailored to their filter designs. This documentation identifies whether filters are washable or disposable. Following manufacturer guidance protects warranty coverage whilst ensuring proper maintenance.
Remove filters carefully to avoid damage. Locate filter access points, typically behind dustbin compartments or top covers. Note filter orientation and positioning for correct reinstallation. Some vacuums use multiple filters requiring removal in specific sequences. Take photographs if needed, documenting the original configuration.
Tap or shake filters outdoors, removing loose surface debris. Hold filters over a bin or outdoors, preventing indoor dust redistribution. Gentle tapping dislodges accumulated particles without requiring water. This preliminary step reduces subsequent washing requirements.
Rinse washable filters thoroughly under running water. Use lukewarm water rather than hot, which might damage certain materials. Direct water flow from the clean side toward the dirty side, forcing debris out rather than deeper into the filter media. Continue rinsing until the water runs completely clear.
Gently squeeze foam filters, expelling trapped water and debris. Avoid twisting or wringing actions that might tear foam material. Use pressing motions instead, compressing foam gently and releasing repeatedly. This technique removes water whilst preserving foam integrity.
Apply a mild cleaning solution for stubborn buildup. Mix small amounts of dish soap in water, creating a gentle cleaning solution. Soak filters for 10-15 minutes, loosening embedded dirt. Rinse thoroughly afterwards, ensuring complete soap removal. Soap residue affects filtration performance and might damage motors.
Allow complete drying for 24-48 hours before reinstallation. Position filters in well-ventilated areas away from direct heat sources. Ensure both surfaces receive adequate airflow. Installing damp filters risks mould growth and motor damage. Patience during drying prevents these problems entirely.
Inspect filters during cleaning for damage requiring replacement. Check for tears, holes, or deteriorated materials. Foam filters showing compression or hardening need replacement. HEPA filters with damaged pleats require disposal. Identifying damage early prevents poor vacuum performance.
Understanding Filter Warranties
Filter warranties vary significantly between manufacturers and vacuum models. Understanding warranty coverage helps you make informed decisions about maintenance versus replacement. However, filter warranties often differ from overall vacuum warranties, creating potential confusion.
Most vacuum warranties exclude filters as consumable items. Manufacturers consider filters similar to light bulbs—components requiring periodic replacement during normal use. However, some premium brands include filter replacement within warranty periods. Carefully review warranty terms, identifying what’s actually covered.
Miele typically includes one set of replacement filters with new vacuum purchases. Their premium positioning extends to comprehensive warranty coverage. However, subsequent filter replacements fall on the owner. This approach provides initial coverage whilst acknowledging filters’ consumable nature.
Dyson offers generous washable filter warranties covering manufacturing defects. If filters develop structural problems like torn seals or damaged frames, warranty coverage typically applies. However, normal wear from proper use and maintenance isn’t covered. Documentation proving proper maintenance helps warranty claims.
Budget brands rarely provide specific filter warranties beyond general vacuum coverage. This limitation reflects their lower price points and business models. Filter replacement becomes an expected ownership cost with these brands. Factor this ongoing expense into total ownership calculations.
Extended warranties purchased separately might include filter coverage. Review extended warranty terms carefully before purchasing. Some retailers offer service plans, including routine maintenance items like filters. These plans make financial sense for expensive vacuum models with costly replacement filters.
Warranty claims require proper maintenance documentation. Manufacturers might deny claims if filters show evidence of misuse or neglect. Washing non-washable filters, using harsh chemicals, or failing to follow manufacturer guidelines can void warranties. Maintaining cleaning records protects warranty rights.
Understanding warranty limitations helps budget for filter maintenance. If warranties don’t cover filters, allocate funds for replacement or cleaning supplies. This planning prevents surprise expenses from derailing household budgets. Calculate annual filter costs when comparing vacuum models during purchase decisions.
Even with proper techniques, certain filter cleaning challenges arise regularly. Understanding these issues and their solutions prevents frustration whilst ensuring effective maintenance. Many problems have simple fixes once you identify the underlying cause.
Filters remaining dirty after thorough washing indicate embedded debris. Some particles penetrate deeply into filter media, resisting simple rinsing. Solution involves extended soaking in warm water with mild detergent. Allow 30-60 minutes soaking time, loosening stubborn deposits. Multiple rinse cycles might prove necessary to achieve truly clean filters.
Persistent odours after cleaning suggest microbial growth within filter materials. Bacteria and mould developing in damp filters create musty smells. Solution requires adding white vinegar to rinse water, creating a hostile environment for microbes. Mix one part vinegar with three parts water, soak filters for 15-20 minutes, then rinse thoroughly. Ensure complete drying afterwards, preventing recurrence.
Filters taking excessively long to dry frustrate many users. Thick foam filters or complex pleated designs retain moisture stubbornly. The solution involves improving air circulation around drying filters. Position near fans or in warm, dry areas. Gently squeeze excess water before drying. Consider purchasing spare filters, allowing continuous vacuum use whilst others dry.
Filter damage during cleaning occurs through excessive force or improper technique. Torn foam, separated seals, or damaged pleats render filters useless. Prevention requires gentle handling throughout the cleaning process. Use appropriate water pressure, avoiding high-pressure settings. Support filters properly during handling, preventing stress on weak points.
Difficulty determining when filters are truly clean challenges many users. Some dirt remains visually apparent despite thorough cleaning. Solution involves accepting that washable filters rarely look pristine. Focus on functionality rather than appearance. If water runs clear and filters feel clean when squeezed, they’re adequately maintained.
Reinstallation problems after cleaning indicate incomplete drying or improper orientation. Swollen filters from retained moisture won’t fit properly. Incorrect positioning prevents proper sealing. Solution requires verifying complete dryness through touch and allowing additional drying time if needed. Reference photographs taken during removal, ensuring correct reinstallation orientation.
Maximising Filter Cleaning Efficiency
Optimising your filter maintenance routine saves time whilst delivering better results. These efficiency tips streamline the cleaning process without compromising thoroughness. Implementing these strategies makes regular maintenance less burdensome, encouraging consistent filter care.
Schedule filter cleaning during natural vacuum use breaks. Clean filters whilst performing other household tasks like laundry or dishwashing. This multitasking approach eliminates dedicated filter cleaning time. The filters soak whilst you complete other chores, then rinse and set to dry before moving on.
Keep spare filters enabling continuous vacuum use. Purchase an extra set of washable filters or keep spare disposables on hand. When filters need cleaning or replacement, swap them immediately and continue vacuuming. Clean the removed filters at your convenience rather than halting cleaning sessions. This strategy particularly benefits large homes requiring extended vacuum sessions.
Create a dedicated filter drying station, streamlining the process. Designate a specific area with good airflow for filter drying. Keep a small drying rack or clean towels available. Having established a drying space eliminates searching for suitable locations each time. The consistent setup speeds the entire maintenance routine.
Batch clean multiple filters together when possible. If you own multiple vacuums or your model uses several filters, clean everything simultaneously. This batching eliminates repeatedly setting up and cleaning up for individual filter maintenance. The efficiency gains prove substantial over time.
Use calendar reminders, ensuring consistent maintenance schedules. Set monthly alerts on smartphones or mark calendars specifically for filter maintenance. These reminders prevent neglect until performance degrades noticeably. Proactive maintenance proves far easier than addressing severely clogged filters.
Inspect filters briefly during every dustbin emptying. This quick check takes seconds but provides an early warning of excessive buildup. When filters look particularly dirty during routine checks, schedule cleaning immediately rather than waiting for scheduled maintenance. This flexibility prevents performance degradation between scheduled cleanings.
Optimise drying time through strategic positioning. Place filters near dehumidifiers, heating vents, or in warm, dry areas. Increased ambient temperature and reduced humidity accelerate drying substantially. Avoid direct heat sources like radiators that might damage materials, but take advantage of naturally warm, dry locations.
Recommended Filter Cleaning Frequency
Determining optimal filter cleaning frequency depends on multiple factors, including usage intensity, household conditions, and filter type. Understanding these variables helps you establish personalised maintenance schedules delivering optimal vacuum performance without excessive cleaning.
Standard usage in average homes typically requires monthly filter cleaning. This frequency suits households vacuuming 2-3 times weekly without exceptional dirt or pet hair. Monthly maintenance prevents significant performance degradation whilst remaining manageable. Mark calendars or set reminders, ensuring consistent monthly cleaning.
Heavy usage or challenging conditions demand more frequent attention. Homes with multiple pets, young children, or high traffic patterns accumulate debris faster. These situations might require bi-weekly filter cleaning, maintaining adequate suction. Commercial vacuum use definitely requires weekly or even daily filter maintenance, depending on workload.
Light usage in smaller homes or single-person households might allow extended intervals. Vacuuming once weekly in compact spaces with minimal debris allows 6-8 week cleaning intervals. However, monitor performance carefully, ensuring suction remains adequate. Extended intervals risk damaging motors through restricted airflow, even with light use.
Pre-motor filters typically require more frequent attention than exhaust filters. Pre-motor filters encounter concentrated debris before cyclonic separation or bagging. These filters accumulate dirt faster, requiring weekly inspection and monthly cleaning. Exhaust filters handling already-filtered air might last 2-3 months between cleanings.
HEPA filters often feature different maintenance schedules than standard filters. According to the Asthma and Allergy Foundation of America, maintaining clean filtration systems proves essential for managing indoor allergens. Some HEPA filters require replacement every 6-12 months rather than washing. Consult manufacturer guidance for specific recommendations.
Seasonal variations might necessitate schedule adjustments. Spring and autumn often bring increased dust and pollen into homes. Consider increasing filter cleaning frequency during these seasons. Summer might allow reduced frequency in air-conditioned homes with controlled environments.
Performance monitoring provides the most accurate scheduling guidance. If vacuum suction noticeably decreases before scheduled maintenance, increase cleaning frequency. If filters look clean at scheduled intervals, extend the timeline slightly. Personalise schedules based on actual performance rather than rigid calendars. For vacuums offering superior filtration systems worth maintaining diligently, explore our top recommendations in our complete vacuum buying guide.
Proper Filter Storage Between Uses
Proper filter storage proves just as important as cleaning technique. Correct storage practices extend filter lifespan whilst preventing contamination, requiring additional cleaning. Understanding storage best practices protects your investment in quality filters.
Store completely dry filters in clean, dry locations. Any residual moisture encourages mould and mildew growth, ruining filters. Verify absolute dryness through touch before storage. If any dampness remains, continue drying. The patience required for complete drying prevents expensive, premature replacement.
Use sealed containers or plastic bags to protect filters from dust accumulation. Clean filters exposed to household dust between uses require re-cleaning before installation. Sealed storage maintains filter cleanliness indefinitely. Clear containers allow visual confirmation of stored filter condition without opening the packaging.
Avoid storing filters in damp locations like bathrooms or unheated garages. These environments promote mould growth even in seemingly dry filters. Humidity alone can cause problems. Choose storage locations with consistent, moderate humidity levels. Bedroom cupboards or hallway storage typically provide suitable environments.
Store spare filters near vacuum locations for convenient access. Keeping replacement or backup filters close to where you vacuum eliminates searching during maintenance. This accessibility encourages regular filter changes rather than postponing them because you can’t locate spares.
Label stored filters identifying their specific vacuum model. If you own multiple vacuums, filter confusion causes frustration. Simple labels indicating “Dyson V15” or “Shark Navigator” eliminate guesswork. This organisation proves especially valuable in households with several vacuum types.
Protect filters from physical damage during storage. Avoid crushing or compressing filters under other items. Maintain their original shape, preventing permanent deformation affecting fitment. Dedicated storage containers provide this protection whilst keeping filters organised.
Check stored filters periodically for unexpected deterioration. Even proper storage doesn’t guarantee indefinite filter preservation. Materials can degrade over time from age alone. Annual inspection of stored spares ensures they remain usable when needed.
Understanding how to clean a vacuum cleaner filter properly represents one of the most valuable maintenance skills you’ll develop. This relatively simple task delivers remarkable benefits, including restored suction power, improved air quality, extended vacuum lifespan, and substantial cost savings. The fifteen minutes invested in regular filter maintenance prevent hundreds of pounds in premature vacuum replacement or professional repairs.
Throughout this guide, I’ve shared practical techniques learned through years of maintaining various vacuum types. The key takeaway involves recognising that filter maintenance isn’t optional—it’s essential for optimal vacuum performance. Neglecting this simple task creates a cascade of problems, including poor cleaning performance, increased energy consumption, elevated noise levels, and ultimately premature vacuum failure.
The versatility of filter cleaning approaches ensures everyone can maintain their vacuum regardless of budget or available time. Whether using simple water rinsing, compressed air cleaning, or replacement with affordable generic filters, multiple options exist. Choose methods matching your specific situation rather than feeling constrained by perceived limitations.
Environmental considerations surrounding filter maintenance prove increasingly important. Choosing washable filters over disposable alternatives dramatically reduces landfill waste. Proper disposal of genuinely worn-out filters respects environmental responsibilities. The indirect energy savings from efficiently operating vacuums compound over the years of use.
Brand-specific maintenance recommendations deserve careful attention. Following manufacturer guidance protects warranty coverage whilst optimising performance. However, the fundamental principles of how to clean a vacuum cleaner filter remain consistent across brands. Understanding these principles allows confident maintenance regardless of the specific vacuum model.
Common challenges like persistent odours, extended drying times, or stubborn embedded dirt have straightforward solutions. Don’t let these temporary obstacles discourage regular maintenance. The long-term benefits far outweigh occasional frustrations. Consider challenges as learning opportunities to improve your maintenance skills.
Establishing consistent cleaning schedules prevents performance degradation before it becomes noticeable. Monthly maintenance suits most households, though your specific situation might require adjustments. Monitor vacuum performance between scheduled cleanings, adjusting frequency as needed. Trust your observations over rigid schedules.
Proper storage between uses extends filter lifespan substantially. Complete drying before storage prevents mould growth. Sealed containers protect filters from dust contamination. These simple practices ensure filters remain ready for immediate use when needed.
The financial savings from proper filter maintenance prove substantial over your vacuum’s lifetime. Avoiding premature replacement saves $200-500. Preventing motor repairs saves another $100-300. These savings dwarf the minimal cost of filter cleaning supplies or occasional replacements.
For those seeking vacuums with excellent filtration systems worth maintaining properly, I encourage exploring quality models designed for long-term ownership. Regular filter maintenance maximises your investment in these premium machines. For comprehensive vacuum recommendations with superior filtration, visit our complete guide to the best vacuum cleaners for detailed comparisons across all price points and feature sets.
Remember, learning how to clean a vacuum cleaner filter properly transforms vacuum ownership from frustrating decline to consistent, reliable performance. Take these fifteen minutes monthly, follow the guidance provided here, and enjoy years of optimal cleaning performance from your vacuum investment.
Why Your Vacuum Cleaner Smells Bad (And How to Fix It)
You know that moment when you’re hoovering away, feeling productive and domestic, and suddenly you catch a whiff of something absolutely foul? Your vacuum cleaner smells bad, and now instead of freshening your home, you’re essentially spreading eau de garbage around your living room. I’ve been there, and trust me, it’s both embarrassing and frustrating, especially when guests are arriving in an hour.
The good news is that smelly vacuums are incredibly common, and more importantly, they’re usually fixable without spending a fortune on repairs or replacements. Whether your vacuum cleaner smells like wet dog, burnt rubber, or something that died in there three weeks ago, there’s almost always a solution that doesn’t involve throwing the whole thing away.
I’ve dealt with every vacuum smell imaginable over years of testing and reviewing cleaning equipment. Some smells indicate simple maintenance issues, whilst others signal problems that need immediate attention. Understanding the difference between “this needs a good clean” and “this might catch fire” is crucial for both your home’s cleanliness and your safety.
In this guide, I’ll walk you through exactly why vacuum cleaners develop unpleasant odours, what different smells actually mean, and most importantly, how to eliminate them. We’ll cover everything from basic cleaning techniques to preventive maintenance that stops smells before they start. If you’re considering whether it’s time for a new vacuum altogether, check out our guide to the best bagless canister vacuum cleaners to see what modern options offer in terms of odour control.
The reality is that most vacuum smells are preventable with proper care, but once they’ve taken hold, you need to address them systematically. Let’s get your vacuum cleaner smelling fresh again.
Understanding the root causes of vacuum odours helps you address them effectively rather than just masking the problem. Vacuum cleaners create the perfect environment for smells to develop through their basic operation.
Trapped Debris and Organic Matter
The primary culprit behind most vacuum smells is accumulated debris. Every time you hoover, you’re sucking up dust, hair, food particles, skin cells, and various organic matter. This material doesn’t always make it cleanly into the dust bag or bin. Instead, it gets trapped in filters, wound around brush rolls, stuck in hoses, or lodged in crevices throughout the vacuum’s interior.
Organic matter decomposes, and decomposition produces odours. That spilt milk you vacuumed last week? It’s now festering inside your machine. Pet hair carries dander, oils, and sometimes outdoor dirt that develops distinctive smells over time. Food crumbs attract moisture and begin breaking down, creating particularly unpleasant aromas.
Moisture and Mould Growth
Moisture is the vacuum cleaner’s smell enemy number one. Many people hoover bathrooms, kitchens, or spills without realising they’re introducing dampness into their machine. Even high humidity in your home can cause problems if the vacuum doesn’t dry properly between uses.
When filters, dust bins, or internal components remain damp, mould and mildew flourish. These fungi produce that characteristic musty, mouldy smell that seems to worsen each time you use the vacuum.
Dirty or Clogged Filters
Filters capture fine particles that would otherwise recirculate into your home’s air. Over time, these filters become saturated with dust, allergens, and microscopic debris. A clogged filter restricts airflow, causing the motor to work harder and run hotter. This combination of trapped particles and elevated temperatures creates persistent odours.
Many vacuum owners forget that filters need regular cleaning or replacement. Operating with dirty filters not only produces smells but also reduces suction power and potentially damages the motor.
Overheating Motor or Belt Issues
That distinctive burnt smell often indicates mechanical problems. Vacuum motors generate significant heat during operation. When airflow becomes restricted due to clogs or dirty filters, the motor can’t cool properly. Overheating motors produce a burnt electrical smell that’s impossible to ignore.
Drive belts that power brush rolls can also create burnt rubber smells when they’re worn, misaligned, or experiencing excessive friction. Whilst these smells are less common than organic odours, they require immediate attention to prevent damage.
Pet-Related Odours
Pet owners face unique vacuum smell challenges. Dog and cat hair carries oils, dander, and outdoor contaminants that create persistent odours. These biological materials cling to every surface inside the vacuum, and traditional cleaning methods don’t always remove them effectively.
Pet accidents add another dimension. Even small amounts of urine can create overwhelming smells that seem impossible to eliminate. The liquid soaks into porous materials inside the vacuum, requiring thorough cleaning to address.
Different Types of Vacuum Smells and What They Mean
Not all vacuum smells indicate the same problem. Understanding what different odours signify helps you diagnose issues and apply appropriate solutions.
Burnt Smell (Electrical or Rubber)
A burnt smell demands immediate attention. This typically indicates one of several mechanical issues that could damage your vacuum or create safety hazards.
Overheating Motor: When vacuum motors overheat, they produce a distinctive burnt electrical smell. This happens when airflow restriction prevents adequate cooling. The motor works harder, generates excessive heat, and begins burning dust accumulated on motor components.
Worn or Damaged Belt: The rubber belt driving the brush roll can produce burnt rubber smells when it’s worn, stretched, or misaligned. Friction from a stuck brush roll or bearing failure causes the belt to heat up excessively.
Blockage-Related Overheating: Complete airflow blockages force motors to work against resistance, generating extreme heat. This is arguably the most dangerous smell scenario because prolonged operation could damage the motor permanently or potentially cause fires.
Action Required: Stop using the vacuum immediately when you detect burnt smells. Inspect for blockages, check belt condition, and allow the motor to cool completely. If the smell persists after addressing these issues, professional repair or replacement may be necessary.
This damp, unpleasant odour indicates moisture problems and potential mould growth inside your vacuum. It’s one of the most common smell complaints, particularly in humid climates or homes where bathrooms get hoovered regularly.
Damp Filters: Washable filters that weren’t dried completely before reinstallation become mould breeding grounds. Even brief dampness can initiate fungal growth that produces persistent musty smells.
Wet Debris: Hoovering damp areas or liquid spills introduces moisture throughout the vacuum’s interior. The dust bin, hoses, and internal cavities retain this moisture, creating ideal mould conditions.
Storage Conditions: Storing vacuums in damp basements, unheated garages, or humid spaces exacerbates moisture problems. Even small amounts of residual moisture become problematic in these environments.
Action Required: This smell requires thorough cleaning and drying of all removable components. Filters need complete drying before reinstallation, and the vacuum should be stored in dry locations.
Pet Odour Smell
This distinctive smell combines wet dog, cat dander, and outdoor contaminants that pets track indoors. It’s persistent because pet-related debris contains oils and biological materials that cling tenaciously to vacuum components.
Hair and Dander Buildup: Pet hair wraps around brush rolls, accumulates in filters, and clogs airways. The hair carries oils, skin cells, and outdoor materials that develop characteristic pet smells.
Accident Residue: Pet urine or vomit that gets vacuumed creates overwhelming odours. The liquid penetrates porous materials and requires enzymatic cleaning to eliminate completely.
Secondary Odours: Even if you haven’t vacuumed accidents directly, pet areas accumulate organic matter that develops smells over time. This material concentrates inside the vacuum.
Action Required: Deep cleaning with enzyme-based cleaners specifically designed for pet odours. Regular maintenance becomes even more critical in pet-owning households.
Rotten or Sewage-Like Smell
This particularly unpleasant odour usually indicates significant organic matter decomposition inside the vacuum. It’s the smell most likely to make guests comment and the hardest to eliminate.
Decomposing Food: Vacuuming kitchen floors inevitably picks up food particles. Small pieces of meat, dairy, or other perishables decompose rapidly, creating foul smells.
Dead Insects or Rodents: Occasionally, small creatures get sucked into vacuums and perish inside. This creates horrific smells that worsen over time.
Bacterial Growth: Certain bacteria thrive in the warm, dark environment inside vacuums. These microorganisms produce particularly offensive odours as they multiply.
Action Required: This smell requires immediate and thorough cleaning of all components. The dust bin needs emptying and washing, filters require replacement, and the entire vacuum needs disinfecting.
How to Get Rid of Vacuum Cleaner Smells: Step-by-Step Solutions
Now for the practical part – actually eliminating those unpleasant odours. These steps progress from basic maintenance to deep cleaning, addressing increasingly stubborn smell problems.
Step 1: Empty and Clean the Dust Container or Replace the Bag
Start with the most obvious source – accumulated debris in the dust collection system. This simple step eliminates many odour problems immediately.
For Bagless Vacuums: Remove the dust bin and empty it into an outside bin. Don’t just dump it in your kitchen bin, where smells will permeate your home. Wash the bin thoroughly with warm, soapy water. Use a bottle brush to reach corners and crevices where debris hides. Rinse completely and allow it to dry thoroughly before reinstalling.
For Bagged Vacuums: Replace the bag even if it’s not full. Partially full bags trap odours that intensify over time. When removing the bag, seal it in a plastic bag before disposing of it to contain smells. Check the bag housing area for debris that escaped the bag and clean it thoroughly.
Many people underestimate how much difference a clean dust bin makes. I’ve seen vacuums transformed from reeking to neutral just by properly cleaning this component. The key is thorough drying – even slight dampness leads straight back to mould problems.
Step 2: Clean or Replace All Filters
Filters are often the primary source of persistent vacuum smells. Most vacuums have multiple filters, and you need to address all of them.
Locate All Filters: Consult your manual to find every filter in your vacuum. Many models have pre-motor filters, post-motor filters, and HEPA filters. Missing even one filter during cleaning leaves a smell source untouched.
Washable Filters: Remove washable filters and rinse them under cool running water until the water runs clear. Gently squeeze (don’t twist or wring) to remove excess water. Allow filters to air dry completely – this typically takes 24-48 hours. Never reinstall damp filters.
Disposable Filters: Replace disposable filters according to manufacturer recommendations. If your vacuum smells bad despite other cleaning efforts, installing fresh filters often solves the problem immediately. Quality filters make a significant difference. Our guide to the best upright vacuum cleaners highlights models with excellent filtration systems that resist odour development.
HEPA Filters: These specialised filters capture microscopic particles but also trap odours. Understanding HEPA filter maintenance helps maximise their effectiveness and lifespan. Replace HEPA filters according to manufacturer schedules, typically every 6-12 months.
Step 3: Check for Clogs and Blockages
Hidden blockages create multiple problems: reduced suction, motor strain, overheating, and trapped debris that generates smells. Systematic inspection reveals obstructions you didn’t know existed.
Hose Inspection: Detach the hose and shine a torch through it. Look for accumulated debris, solidified clumps, or complete blockages. Use a broom handle or plumber’s snake to dislodge stubborn clogs. Wash the hose interior with warm soapy water, rinse thoroughly, and hang it to dry completely.
Airway Passages: Inspect all airways between the cleaning head and the motor. Remove any panels or covers necessary to access these passages. You’ll often find compressed layers of dust, hair, and debris blocking airflow.
Attachment Tools: Clean all attachment tools thoroughly. Crevice tools, upholstery brushes, and other accessories trap debris that contributes to the overall vacuum smell. Wash removable tools with soapy water and dry completely.
I once discovered a fossilised banana that had been wedged in a vacuum hose for weeks, creating an apocalyptic smell. The relief when that blockage finally dislodged was immense. Don’t underestimate how much odour a single hidden obstruction can generate.
The brush roll accumulates hair, string, fibres, and debris that wrap tightly around it. This material traps moisture, develops odours, and eventually affects cleaning performance.
Remove the Brush Roll: Most brush rolls can be removed by unscrewing end caps or releasing locking mechanisms. Consult your manual if the removal process isn’t obvious.
Cut Away Tangled Material: Use scissors or a seam ripper to carefully cut through hair and fibres wrapped around the brush roll. Cut along the length of the roll, being careful not to damage the bristles or the roll itself. Pull away all cut material.
Wash the Brush Roll: Clean the roll with warm, soapy water, paying special attention to areas around bearings where grime accumulates. Use an old toothbrush to scrub stubborn residue. Rinse thoroughly and dry completely before reinstalling.
Check Bearings and Belt: Whilst you have the brush roll removed, inspect the bearings for debris or damage. Check the drive belt for wear, proper tension, and correct alignment. Replace the belt if it shows signs of wear or damage.
Pet owners should perform this maintenance monthly at a minimum. Pet hair creates brush roll buildup faster than any other debris type, and the associated odours develop quickly.
Step 5: Wash All Removable Parts
Beyond the dust bin and filters, many vacuum components are washable and benefit from regular cleaning.
Removable Covers and Panels: Take off any removable plastic covers or panels that protect internal components. Wash these with warm soapy water, scrubbing away accumulated dust and grime. Dry thoroughly before reassembling.
Cleaning Head Assembly: If your vacuum’s cleaning head can be partially disassembled, do so and clean all accessible surfaces. Wipe down areas around the brush roll housing where debris accumulates.
Wheels and Swivels: Don’t overlook wheels and swivel mechanisms. These components collect surprising amounts of hair, string, and sticky residue that contribute to the overall smell. Clean them thoroughly and ensure they move freely.
Exterior Surfaces: Wipe down all exterior surfaces with a damp cloth. Grime on the outside doesn’t directly cause smells, but complete cleaning leaves your vacuum feeling properly maintained.
The goal is to eliminate every possible odour source. Comprehensive cleaning addresses problems you didn’t even realise contributed to the overall smell.
Step 6: Deodorise the Vacuum
After thorough cleaning, deodorising helps eliminate lingering smells and leaves your vacuum smelling fresh.
Baking Soda Method: Sprinkle baking soda liberally over a large area of carpet or hard floor. Let it sit for 15-20 minutes to absorb odours, then vacuum it up slowly. The baking soda passes through your vacuum, neutralising odours throughout the system. This is the safest, most effective deodorising method.
Essential Oil Absorption: Put a few drops of essential oil (lavender, lemon, or eucalyptus work well) on a cotton ball. Place it in the dustbin. As you vacuum, airflow carries the pleasant scent through the system. Replace the cotton ball weekly.
Commercial Vacuum Deodorisers: Various vacuum deodorisers are available, typically in granule or tablet form. These products work adequately but aren’t necessary if you prefer natural solutions. Follow product instructions carefully to avoid damage to filters or motors.
What NOT To Use: Avoid putting essential oils directly on filters, as this can damage filter materials. Don’t use perfumes or air fresheners directly in the vacuum. These can leave sticky residues and potentially damage components. Never vacuum up wet substances specifically to spread scent.
Step 7: Address Specific Odour Types
Different smells require targeted approaches beyond general cleaning.
For Mouldy Smells: After cleaning all components, spray the interior with white vinegar diluted 1:1 with water. Vinegar kills mould spores and neutralises musty odours. Wipe down all surfaces and allow everything to dry completely. Consider running a dehumidifier in the room where you store the vacuum.
For Pet Odours: Use enzyme-based cleaners specifically designed for pet smells. These products break down the organic compounds, causing odours rather than just masking them. Enzyme cleaners work at a molecular level to eliminate pet-related smells effectively. Soak removable components in enzyme solution according to product directions.
For Burnt Smells: If cleaning doesn’t eliminate burnt odours, the smell may have permeated rubber or plastic components permanently. In this case, replacement might be necessary. Check whether your vacuum’s manufacturer sells replacement parts for particularly affected components.
For Sewage or Rotten Smells: These require the most aggressive approach. After thorough cleaning, disinfect all washable components with a mild bleach solution (one tablespoon of bleach per litre of water). Rinse extremely thoroughly to remove all bleach residue, as bleach can damage rubber components if not properly rinsed.
Preventive Maintenance: Stop Smells Before They Start
Prevention is infinitely easier than elimination. These regular maintenance habits keep your vacuum smelling fresh indefinitely.
Empty Frequently: Don’t wait until the dust bin is completely full. Empty it after each use or at least when it reaches half capacity. This single habit prevents most odour problems from developing.
Regular Filter Maintenance: Clean washable filters monthly and replace disposable filters according to manufacturer recommendations. Mark your calendar or set phone reminders to ensure you don’t forget.
Air Dry Between Uses: After vacuuming, remove the dust bin and leave it separate from the vacuum for 30 minutes to allow air circulation. This prevents moisture accumulation and mould growth.
Store Properly: Keep your vacuum in a dry, well-ventilated area. Avoid damp basements, unheated garages, or storage areas prone to humidity. Good storage conditions dramatically reduce mould and mildew problems.
Address Spills Immediately: Never vacuum liquid spills unless you have a specifically designed wet/dry vacuum. If you accidentally vacuum moisture, immediately empty the dust bin, remove filters, and allow everything to dry completely before reassembling.
Monthly Deep Clean: Schedule a monthly deep cleaning session where you systematically clean the dust bin, filters, brush roll, and hose. This regular attention prevents smell-causing buildup.
Use Quality Replacement Parts: When replacing filters, belts, or other components, invest in quality parts. Cheap aftermarket filters often fit poorly, reducing effectiveness and potentially causing odour problems.
Mind What You Vacuum: Be conscious of what you’re vacuuming. Avoid food debris when possible, especially moist or oily materials. Don’t vacuum fireplace ash, construction dust, or other materials your vacuum isn’t designed to handle.
Following these preventive measures makes vacuum smells virtually impossible. I’ve maintained vacuums for years without odour issues simply by adhering to basic maintenance schedules.
When to Consider Replacement
Sometimes, despite your best efforts, a vacuum is beyond saving. Understanding when to repair versus replace helps you make economical decisions.
Persistent Burnt Smells: If burnt odours persist after addressing blockages and replacing the belt, motor damage might be permanent. Motor replacement typically costs more than buying a new vacuum in the same price range.
Pervasive Mould: Severe mould infiltration can prove impossible to eliminate completely. If the mould smell persists after multiple thorough cleanings, replacement might be healthier and more practical than continued remediation attempts.
Age and Wear: Vacuums typically last 5-8 years with proper maintenance. If yours is approaching this age and developing smell problems alongside other issues (reduced suction, mechanical failures), replacement makes more sense than extensive repairs.
Cost-Benefit Analysis: Compare repair or deep cleaning costs against replacement prices. If you’d spend more than 50% of a new vacuum’s cost addressing smell problems in an older unit, replacement is financially sensible.
Modern Features: Newer vacuums often include features that resist odour development: better filtration, antimicrobial dust bins, and improved airflow design. If you’re constantly battling smells in an older vacuum, upgrading to modern technology might solve the problem permanently.
Our guide to the best robot vacuum for carpet showcases models with advanced filtration and maintenance features that minimise odour problems through superior design.
Dealing with a vacuum cleaner that smells bad is frustrating, but it’s usually fixable with systematic cleaning and proper maintenance. The vast majority of vacuum odours stem from accumulated debris, dirty filters, moisture problems, or trapped organic matter rather than serious mechanical failures.
The key to success is understanding what different smells indicate and addressing the root cause rather than just masking odours. Musty smells require drying and mould removal. Pet odours need enzyme cleaners and thorough component cleaning. Burnt smells demand immediate inspection for blockages or mechanical problems. Once you’ve identified the smell type, targeted solutions eliminate it effectively.
Regular maintenance prevents most smell problems from developing. Emptying the dust bin after each use, cleaning filters monthly, removing brush roll tangles regularly, and storing your vacuum properly create conditions where odours simply don’t develop. These simple habits take minutes but save hours of deep cleaning later.
If you’ve tried everything and your vacuum still smells despite thorough cleaning, it might be time to consider replacement. Sometimes the cost and effort of remediation exceed the value of keeping an old, smell-ridden vacuum. Modern vacuums incorporate design improvements that resist odour development, making them worthwhile investments for households that previously struggled with smelly vacuums.
Remember that your vacuum cleaner smelling bad doesn’t mean you’ve done anything wrong. These machines handle dirty jobs in less-than-ideal conditions. Smells develop naturally over time, especially in homes with pets, children, or high traffic. The difference between a fresh vacuum and a smelly one is simply consistent maintenance and prompt attention when problems arise.
For those considering whether a new vacuum might solve persistent odour problems, visit our complete vacuum buying guide at https://smartvacguide.com/best-bagless-canister-vacuum-cleaners to explore options with superior filtration and maintenance features that keep smells at bay.
Your vacuum should make your home cleaner and fresher, not spread unpleasant odours around. With the information in this guide, you now have everything needed to diagnose vacuum smell problems, eliminate them completely, and prevent them from returning. Here’s to fresh-smelling homes and vacuums that actually improve your indoor air quality rather than compromising it.
I know what it’s like to wake up with itchy eyes and a stuffy nose, even after cleaning the day before. For years, I thought I was doing everything right with my cleaning routine. Then I realised my vacuum was actually making things worse, just recirculating dust and allergens back into the air I was breathing. Understanding how to find the best vacuum for allergies and asthma sufferers completely changed my quality of life at home.
And honestly, I wish someone had explained this to me years ago, because some specific features and technologies make a massive difference for people with respiratory sensitivities.
If you or someone in your home deals with allergies or asthma, choosing the right vacuum isn’t just about clean floors. It’s about breathing easier, sleeping better, and actually enjoying your home without constant sniffling and sneezing. The wrong vacuum can trigger symptoms and undo all your cleaning efforts in minutes.
In this guide, I’ll walk you through everything you need to know. We’ll cover the filtration systems that actually trap allergens, the vacuum types that work best for different situations, and the features that matter most when you’re dealing with allergies or asthma. I’ll also help you avoid the common mistakes that keep people trapped in a cycle of ineffective cleaning.
By the end, you’ll know exactly what to look for and why it matters. Let’s find you a vacuum that helps you breathe easier, not harder.
Before diving into specific vacuum models, let’s talk about your unique situation. Every home is different, and what works perfectly for someone else might not be ideal for you.
Your Home’s Size and Layout
The size of your home directly impacts which vacuum type will serve you best. If you’re living in a smaller apartment or flat, a lightweight cordless stick vacuum with good filtration might handle everything you need. However, larger homes often require more powerful motors and longer runtimes to thoroughly clean without triggering allergy symptoms from disturbed dust.
Consider how many levels your home has too. Carrying a heavy upright vacuum up and down stairs can be exhausting, and you’re more likely to skip floors when cleaning feels like a workout. For multi-level homes, you might benefit from our comprehensive guide to the best vacuum cleaners that specialise in whole-home cleaning.
Floor Types Matter More Than You Think
Your flooring plays a huge role in allergen management. Carpets trap allergens deep in their fibres, which means you need strong suction and effective agitation to pull them out. Hard floors like tile, laminate, and hardwood can scatter allergens into the air if your vacuum doesn’t have proper controls.
Mixed flooring presents its own challenges. You need a vacuum that transitions smoothly between surfaces without losing suction or throwing particles around. Many modern vacuums have automatic floor detection, but not all work well for allergy sufferers.
Your Specific Allergy Triggers
Think about what triggers your symptoms most. Pet dander, dust mites, pollen, and mould spores all require slightly different approaches. Pet owners need specialised brush rolls that don’t tangle while still capturing dander. Dust mite allergies demand powerful suction and sealed systems that prevent any escape of particles.
Types of Vacuum Cleaners Explained
Not all vacuums are created equal when it comes to managing allergies and asthma. Let me break down each type and how they perform for respiratory health.
Upright Vacuums
These are the traditional powerhouses you probably grew up with. Modern upright vacuums designed for allergies typically feature sealed systems and HEPA filtration. They offer strong suction and wide cleaning paths, making them efficient for larger carpeted areas.
The downside? Many uprights can be heavy and somewhat clumsy around furniture. However, brands like Dyson and Shark have developed lighter models with excellent allergen containment. If you have mostly carpeted floors and need deep cleaning power, uprights remain a solid choice.
Cordless Stick Vacuums
These have become incredibly popular, and for good reason. They’re lightweight, easy to manoeuvre, and many now include genuine HEPA filtration. I personally switched to a high-quality cordless for my main cleaning, and the convenience means I vacuum more frequently.
The trade-off is battery life and dustbin capacity. You’ll need to empty them more often, which can expose you to allergens if not designed well. Look for models with one-touch emptying systems that minimise dust cloud creation.
Canister Vacuums
Canister vacuums often excel for allergy sufferers because they traditionally have better filtration systems and more powerful motors. The separate canister design allows for larger filters and more sophisticated sealing technology.
They’re particularly excellent for homes with mostly hard floors and area rugs. The wand and hose system gives you incredible reach and control. Miele canister vacuums, for example, are specifically designed with allergen management in mind.
Robot Vacuums
Robot vacuums have improved dramatically for allergy management. While they won’t replace deep cleaning, they’re fantastic for daily maintenance that prevents allergen buildup. Some premium models now include HEPA filtration and self-emptying bases that contain dust.
The key benefit? They clean more frequently than you probably would manually. This consistent maintenance prevents allergens from accumulating to levels that trigger symptoms.
Handheld and Wet/Dry Vacuums
Handheld vacuums are useful for spot cleaning but rarely have the filtration needed for serious allergy management. Wet/dry vacuums can be helpful for specific situations like dealing with mould, but they’re not your primary solution for daily allergen control.
Let’s get into the technical stuff that makes a real difference for allergies and asthma. Some features are marketing hype, but others are genuinely life-changing.
HEPA Filtration: The Non-Negotiable
True HEPA filtration is essential. HEPA stands for High-Efficiency Particulate Air, and genuine HEPA filters capture 99.97% of particles as small as 0.3 microns. That includes dust mites, pollen, pet dander, and mould spores.
However, not all “HEPA-type” or “HEPA-style” filters meet true HEPA standards. Look for vacuums certified with genuine HEPA filtration. Additionally, the vacuum must have a sealed system, meaning all air passes through the HEPA filter before being expelled. Without sealing, dirty air can leak around the filter.
Sealed System Engineering
This is where many vacuums fail allergy sufferers. A vacuum might have a HEPA filter but still leak unfiltered air through gaps in its construction. Quality vacuum manufacturers engineer completely sealed pathways from the intake to the exhaust.
When researching vacuums, specifically look for terms like “fully sealed system” or “100% sealed filtration.” This ensures every bit of air you’re sucking up gets properly filtered before returning to your room.
Suction Power and Motor Quality
Strong, consistent suction is crucial for pulling allergens from carpets and preventing them from becoming airborne during cleaning. Look for vacuums with powerful digital motors that maintain suction even as the dustbin fills.
Air watts or suction power ratings can be useful comparisons, but real-world performance matters more. Check our top-rated vacuums for allergies to see which models consistently perform well in actual homes.
Bagless vs Bagged: The Allergy Perspective
This is controversial among allergy experts. Bagged vacuums contain dust more securely during disposal, minimising your exposure when emptying. However, replacement bags create ongoing costs and environmental waste.
Modern bagless vacuums with good designs can work well if they have bottom-emptying mechanisms and long extension wands that let you empty them directly into outside bins. The key is minimising the dust cloud that happens during emptying.
Floor Type Considerations
Different floor types require different approaches to allergen management. Let’s optimise your vacuum choice for your specific flooring.
Carpet Cleaning for Allergen Removal
Carpets are allergen magnets, trapping particles deep in their fibres. You need a vacuum with strong suction, effective brush agitation, and most importantly, excellent filtration. The vacuum must pull allergens out without putting them back into the air.
Upright vacuums typically excel here because their brush rolls make direct contact with the carpet. Look for models with motorised brush rolls and adjustable height settings. Deep cleaning carpets once or twice weekly helps manage allergen levels significantly better than quick daily passes.
Hard Floor Challenges
Hard floors seem like they’d be easier for allergies, but they present different challenges. Without carpet fibres to trap particles, allergens sit on the surface and become airborne easily. Aggressive brush rolls can scatter particles rather than contain them.
For hard floors, you want a vacuum with a soft roller designed specifically for hard surfaces. Many cordless stick vacuums now include dual brush heads for this reason. The soft roller gathers fine dust without flinging it around your space.
Mixed Flooring Solutions
Homes with both carpet and hard floors need versatile vacuums. Automatic floor detection is helpful but not essential. More important is easy adjustment between floor types without losing suction or creating dust clouds during transitions.
Consider vacuums with multiple cleaning heads if your budget allows. Having a dedicated hard floor head and a carpet head ensures optimal cleaning for each surface. This prevents you from compromising effectiveness on either surface type.
Budget Planning
Quality vacuums for allergies require investment, but you don’t necessarily need the most expensive model. Let’s break down what you can expect at different price points.
Entry-Level Options (Under $150)
At this price point, you’re making compromises. True sealed HEPA systems are rare, though some brands offer good filtration without complete sealing. These vacuums can work if your allergies are mild and you vacuum frequently.
Look for brands like Shark or Hoover that offer HEPA filtration in budget-friendly models. They might not last as long as premium options, but they’re better than continuing with a vacuum that aggravates your symptoms.
Mid-Range Sweet Spot ($150-$400)
This range offers the best value for most allergy sufferers. You’ll find genuine sealed HEPA systems, quality motors, and durable construction. Brands like Shark, some Dyson models, and certain Miele vacuums fall here.
These vacuums balance performance, features, and longevity well. If you can afford this range, you’re getting legitimate allergen control that will last several years with proper maintenance. Many people find this range perfectly adequate for managing moderate to severe allergies.
Premium Investments ($400+)
Premium vacuums offer the absolute best filtration, strongest motors, and longest lifespans. Miele, high-end Dyson models, and specialised allergen-control vacuums live in this category.
The question is whether the extra investment matches your needs. If you have severe asthma or significant allergy concerns, the superior filtration and reliability might be worth it. These vacuums often last 10+ years, which helps justify the upfront cost.
Long-Term Value Thinking
Consider the total cost of ownership, not just the purchase price. Bagged vacuums need ongoing bag purchases. Filters need replacing, though washable filters reduce this cost. Cheaper vacuums might break sooner, requiring replacement.
Calculate what you’ll spend over five years, including maintenance and potential replacements. Sometimes spending more upfront actually costs less long-term while providing better allergy relief throughout.
When your respiratory health is on the line, brand reliability matters more than usual. Let’s discuss which manufacturers take allergy concerns seriously.
Leading Brands for Allergy Management
Miele has built their reputation partly on exceptional filtration and sealed systems. Their vacuums are specifically designed with allergy sufferers in mind, though they command premium prices. Dyson invests heavily in cyclonic technology and filtration, offering strong performance in lighter packages.
Shark has emerged as a value leader, providing sealed HEPA systems at more accessible price points. Their anti-allergen technology and lift-away designs work well for many people. SEBO and Riccar are less known but highly regarded in allergy communities for their commercial-grade filtration.
Warranty and Support Expectations
Quality vacuum brands typically offer 2-5 year warranties on their allergen-focused models. This protection is important because you’re making a health investment. Cheaper brands might only offer one year, which can be a red flag.
Good customer service matters when you have questions about filter maintenance or performance concerns. Brands with responsive support teams and clear documentation help you maintain optimal allergen control over time.
Where to Purchase With Confidence
Buying from authorised retailers ensures warranty coverage and genuine products. Amazon, dedicated appliance stores, and manufacturer websites are typically safe. Be cautious with third-party sellers offering steep discounts, as counterfeit filters and parts can compromise your allergy protection.
Reading verified customer reviews from actual allergy sufferers helps identify real-world performance. Look for reviews specifically mentioning allergy improvements or respiratory benefits rather than just general cleaning satisfaction.
Special Considerations for Allergies and Asthma
Let’s dive deep into the specific features that make the biggest difference for respiratory health. This section is crucial for getting your decision right.
HEPA Filtration Levels and Certification
Not all HEPA filters are identical. True HEPA 13 filters capture 99.95% of particles, while HEPA 14 filters reach 99.995%. For most people, HEPA 13 is sufficient, but severe asthma might benefit from HEPA 14.
Certification matters. Look for independent testing certification rather than just manufacturer claims. European EN 1822 standards or similar certifications indicate genuine testing and validation of filtration performance.
Sealed System Testing
Some manufacturers actually test and certify their entire vacuum as sealed, not just the filter. This whole-machine certification ensures no allergens escape anywhere in the system. It’s worth specifically seeking out models with this level of testing.
Ask whether the vacuum maintains its seal over time and through regular maintenance. Some designs lose sealing as parts age or after filter changes. Robust engineering maintains allergen control throughout the vacuum’s lifespan.
Dust Disposal Methods
How you empty the dustbin significantly impacts your exposure to allergens. Bottom-emptying bins are generally better than top-opening designs because they create less dust cloud. Some vacuums include mechanisms that compress dust into blocks, further reducing particle escape.
For severe allergies, bagged systems still offer the best containment during disposal. Modern allergen-barrier bags seal automatically when removed, preventing dust from escaping. This extra protection might be worth the ongoing bag cost.
Washable vs Replaceable Filters
Washable HEPA filters sound economical, but they require careful maintenance. You must dry them completely before reinstalling, which can take 24-48 hours. Incomplete drying can lead to mould growth inside your vacuum.
Replaceable filters offer consistency and convenience. You simply swap them out every 6-12 months, depending on usage. While they cost more in the long run, you always have optimal filtration performance without maintenance concerns.
Additional Allergen-Control Features
Some vacuums include UV lights for killing dust mites or antimicrobial treatments in components. These features can help, but aren’t essential. Focus first on excellent HEPA filtration and system sealing before considering add-on features.
Carbon filters help with odours if you have pets, but they don’t impact allergen control directly. They’re nice to have, but shouldn’t be your deciding factor when choosing a vacuum for allergy management.
Common Mistakes to Avoid
I’ve seen people make these mistakes repeatedly and they keep suffering unnecessarily. Let’s make sure you don’t fall into these traps.
Choosing Based on Price Alone
The cheapest vacuum with “HEPA” on the box isn’t going to cut it for real allergy control. I understand budget constraints, but a $50 vacuum that doesn’t seal properly will actually make your allergies worse by stirring up and releasing allergens.
It’s better to save a bit longer and get a vacuum with genuine sealed HEPA filtration than to buy something inadequate now. Consider it a health investment rather than just a cleaning tool.
Ignoring Your Specific Floor Types
Buying an amazing carpet vacuum when you have mostly hardwood floors wastes performance and money. Similarly, a hard-floor specialist won’t deep-clean carpets effectively. Match your vacuum’s strengths to your actual flooring situation.
Many people also forget about area rugs and transitions. Ensure your vacuum handles all your floor types well, not just the predominant one.
Overlooking Maintenance Requirements
Some vacuums require frequent filter cleaning or replacement, while others need less attention. If you’re already struggling with allergy symptoms, complex maintenance might mean you avoid doing it properly.
Choose a vacuum with maintenance you’ll actually perform consistently. Simple, infrequent maintenance beats complicated procedures you’ll procrastinate on.
Not Considering Long-Term Costs
That vacuum with cheap replacement filters might seem great initially, but if the filters need replacing monthly, costs add up quickly. Calculate the total cost over several years, including bags, filters and potential repairs or replacement.
Sometimes paying more upfront for a more durable vacuum with less expensive maintenance actually saves money while providing better allergy relief.
You’ve learned a lot, so let’s turn that knowledge into action. Here’s how to make your final choice with confidence.
Create Your Personal Checklist
Write down your must-have features based on your specific situation. Your list might include: genuine sealed HEPA filtration, lightweight design, cordless convenience, or strong carpet performance. Having this written down keeps you focused when browsing options.
Don’t let marketing distractions sway you from your actual needs. If you primarily have hard floors, don’t pay extra for advanced carpet features you won’t use.
Prioritise Your Must-Haves
Rank your requirements by importance. For allergy management, sealed HEPA filtration should always be at the top. Then consider factors like weight, battery life, or specific floor type performance based on your situation.
This prioritisation helps when you’re comparing models and making trade-offs. No vacuum is perfect, but you can find one that excels at what matters most to you.
Research Real User Experiences
Read reviews from verified purchasers, especially those who mention allergies or asthma specifically. Their experiences reveal real-world performance beyond manufacturer claims. Look for patterns in reviews rather than focusing on individual extreme opinions.
YouTube reviews can be particularly helpful for understanding noise levels, ease of use, and actual cleaning performance. Watch several reviews of any vacuum you’re seriously considering.
Try Before Committing If Possible
Some retailers allow returns within 30-60 days, which lets you test a vacuum in your actual home. This trial period is invaluable for confirming it helps your symptoms rather than triggering them.
If friends or family own vacuums you’re considering, ask if you can try them. A few minutes of hands-on experience teaches you more than hours of research.
Conclusion on How To Find The Best Vacuum For Allergies and Asthma Sufferers
Finding the right vacuum for allergies and asthma genuinely transforms your daily comfort and health. It’s not just about clean floors anymore—it’s about creating a home where you can breathe easily and sleep peacefully without constant symptoms.
The most important factors are genuine sealed HEPA filtration, reliable construction, and matching the vacuum type to your specific floor types and home size. Don’t compromise on the core filtration features, even if it means waiting a bit longer to afford a quality model.
Remember that this is an investment in your health and quality of life. The difference between struggling with allergy symptoms daily and breathing freely at home is absolutely worth the effort and expense of choosing the right vacuum.
Start by identifying your specific needs and priorities using the checklist approach we discussed. Then research models that excel in those areas, reading reviews from other allergy sufferers. Take your time with this decision because you’ll live with the results every day.
Whatever you choose, commit to regular vacuuming with your new machine. Even the best vacuum for allergies and asthma sufferers only works if you use it consistently. Set a schedule that keeps allergen levels manageable before they build up to symptom-triggering levels.
If you’re ready to explore specific models in depth, see our detailed comparison of top models designed specifically for respiratory health. You deserve to breathe freely in your own home, and the right vacuum is a crucial step toward that goal.
Take a deep breath, with the right vacuum, soon that deep breath will feel clean, clear, and comfortable. Your respiratory system will thank you.
I still remember the day I bought my first cordless vacuum. I was so excited about the freedom of no cord. Then reality hit, the battery died halfway through cleaning my living room. Frustrating doesn’t even begin to cover it. But here’s the twist: I wouldn’t go back to a corded vacuum now. Why? Because I finally learned how to choose between cordless and corded vacuum cleaners based on my actual needs.
This decision matters more than you might think. Get it wrong, and you’ll spend years being annoyed every time you clean. Maybe you’re constantly hunting for outlets with a corded model. Or perhaps you’re frustrated by a cordless vacuum that can’t finish the job. Either way, it’s not fun.
The good news? This doesn’t have to be complicated. I’m going to walk you through everything you need to know. We’ll cover the real-world pros and cons of each type. I’ll share insights from testing dozens of models. More importantly, I’ll help you figure out which type fits your specific situation.
Think of this as advice from a friend who’s made all the mistakes already. By the end of this guide, you’ll know exactly whether cordless or corded is right for you. No marketing hype, no confusing jargon – just honest, practical guidance. Let’s dive in and solve this puzzle together.
Understanding Your Cleaning Needs
Before we compare cordless and corded vacuums, let’s talk about you. Your home’s characteristics largely determine which type works better. This is where most people start making mistakes.
Home Size and Layout Considerations
How big is your space? This is crucial for the cordless vs corded debate. Small apartments under 1,000 square feet are perfect for cordless vacuums. You can clean everything on a single charge. Larger homes over 2,000 square feet? That’s where cordless models start struggling.
Layout matters too. Do you have multiple rooms spread across different floors? Cordless vacuums shine here. You’re not dragging a cord up and down stairs. Open-plan spaces work well with either type. However, corded vacuums give you unlimited runtime for bigger areas.
How many electrical outlets do you have? Sounds silly, but this affects corded vacuum convenience. Older homes often have fewer outlets. You’ll spend time unplugging and moving around. Modern homes with outlets everywhere make corded models more practical.
Floor Types You Have
Your flooring influences which vacuum type performs better. Hard floors like wood, laminate, and tile are easy for both types. Cordless vacuums actually excel here. They’re quick and convenient for surface cleaning.
Thick carpets change the equation dramatically. Deep carpet cleaning demands more power. Corded vacuums typically provide stronger, more consistent suction. Cordless models work on carpet but drain batteries faster. High-pile carpets especially challenge cordless technology.
Mixed flooring is common in most homes. You’ve got carpet in bedrooms and hardwood in living areas. Both vacuum types handle this fine. However, cordless models transition between floors more easily. No cord catching on transitions or doorways.
Specific Challenges
Do you have pets? Pet hair is demanding. It requires consistent, strong suction. Corded vacuums maintain power throughout cleaning. Cordless models might lose suction as batteries drain. That said, modern cordless technology is improving rapidly.
Allergies in the household? Both types can have HEPA filtration. The difference is runtime. Thorough allergy cleaning takes time. Corded vacuums let you work as long as needed. Cordless models might require multiple charging sessions.
Kids and daily messes favor cordless convenience. Quick spill clean-ups are effortless. Just grab it and go. No unwinding cords or finding outlets. For deep weekly cleans, corded might still be better.
The Cordless Vacuum: Pros and Cons
Let me break down cordless vacuums honestly. I’ve tested dozens of them. They’re not perfect, but they’ve improved dramatically in recent years.
The Major Advantages
Freedom of movement is the biggest win. You’re not tethered to outlets. You can vacuum anywhere without planning your route. This sounds minor until you experience it. Then you’ll understand why people love cordless.
Convenience for quick clean-ups is unmatched. Someone spilled cereal? Grab the vacuum and done. No setup, no hassle. This convenience changes your cleaning habits. You vacuum more often because it’s easy.
Storage is simpler with cordless models. Most mount on walls. They take up minimal space. No more shoving a bulky vacuum into a crowded closet. Your vacuum becomes almost invisible when not in use.
Lighter weight makes them easier to handle. Most cordless vacuums weigh under 7 pounds. You can carry them upstairs effortlessly. Cleaning above-floor surfaces becomes simple. Stairs, furniture, car interiors – all easy.
Multi-floor homes benefit enormously. Moving between floors with a corded vacuum is annoying. You’re carrying a heavy machine while managing a long cord. Cordless eliminates this completely. Each floor gets cleaned without the hassle.
The Real Downsides
Battery life limitations are the biggest issue. Most cordless vacuums run 20-40 minutes on high power. That’s enough for small to medium homes. Large homes might need multiple sessions. This can be frustrating when you’re in cleaning mode.
Power consistency decreases as batteries drain. Unlike corded models, suction weakens gradually. The first 10 minutes are great. The last 10 minutes? Not so much. Some newer models maintain power better.
Battery degradation over time is inevitable. After 2-3 years, runtime decreases noticeably. Eventually, you’ll need a replacement battery. These cost £50-£100. Factor this into your total ownership cost.
Upfront costs are higher for equivalent performance. A cordless vacuum with similar power to a £200 corded model? Expect to pay £300-£400. You’re paying for the battery technology. Decide if the convenience justifies the premium.
Dust capacity tends to be smaller. Cordless vacuums are lighter, which means smaller bins. You’ll empty them more frequently. Not a huge deal, but worth considering.
The Corded Vacuum: Pros and Cons
Now let’s talk about traditional corded vacuums. They’re not outdated technology. Many situations still favor corded models.
The Major Advantages
Unlimited runtime is the obvious benefit. Clean for as long as needed. Large homes? No problem. Deep cleaning sessions? Go for it. You’re never watching a battery indicator anxiously.
Consistent power throughout cleaning is huge. Suction doesn’t diminish. The last room gets the same performance as the first. This matters for thorough cleaning. Especially on thick carpets or heavy pet hair.
Generally more powerful motors are possible. Without battery weight constraints, manufacturers build stronger motors. This translates to better deep-cleaning performance. Particularly noticeable on carpets and upholstery.
Lower purchase price for equivalent performance. A quality corded vacuum costs £150-£250. A comparable cordless model? £300-£400. That’s significant savings. Budget shoppers appreciate this difference.
No battery replacement costs over time. Your vacuum works the same in year five as year one. Well, assuming you maintain it properly. No degrading performance or expensive battery purchases.
Larger dust capacities are common. Corded vacuums aren’t constrained by weight. Bigger bins mean less frequent emptying. Large homes particularly benefit from this feature.
The Real Downsides
Cord management is genuinely annoying. You’re constantly dealing with it. Unwinding before cleaning, rewinding after. Moving between rooms means unplugging and replugging. It breaks your workflow.
Limited radius means planning your route. Most cords are 25-30 feet. Add the hose, and you get about 40 feet total. Still, you’ll switch outlets multiple times. Large homes multiply this frustration.
Heavier and bulkier than cordless models. Most corded vacuums weigh 12-18 pounds. That’s double a cordless model. Carrying upstairs? More challenging. Maneuvering? Less nimble.
Storage requires more space. You need a decent-sized closet. Plus somewhere to wrap or store the cord. In small homes, this matters. Your vacuum becomes a space hog.
Stairs and tight spaces are problematic. The cord catches on corners. You’re dragging weight behind you. Cleaning stairs with a corded upright? That’s a workout.
Understanding Battery Technology (Cordless)
If you’re considering cordless, understanding batteries is essential. This knowledge prevents disappointment and helps you make smarter choices.
Lithium-Ion Battery Basics
Modern cordless vacuums use lithium-ion batteries. These are the same technology in your phone and laptop. They’re lightweight and powerful. However, they have limitations.
Voltage affects power, not runtime. You’ll see 18V, 25V, or even 40V batteries advertised. Higher voltage can mean more power. But it doesn’t necessarily mean longer runtime. Don’t confuse the two metrics.
Capacity, measured in amp-hours (Ah), determines runtime. A 3,000mAh battery lasts longer than 2,000mAh. However, manufacturers don’t always advertise this spec. Focus on real-world runtime reviews instead.
Real-World Runtime Expectations
Marketing claims are misleading. Manufacturers test on eco mode with no load. Real-world performance is different. High-power mode on carpet? Expect 15-30 minutes maximum.
Floor type dramatically affects runtime. Hard floors require less power. You might get 40-50 minutes. Thick carpets drain batteries in 15-20 minutes. Plan your cleaning accordingly.
Removable batteries are a game-changer. Some models include two batteries. Clean for 30 minutes, swap batteries, continue cleaning. This solves the runtime problem. It also costs more upfront.
Battery Care and Lifespan
Lithium-ion batteries degrade over time. Expect 500-1,000 charge cycles before noticeable decline. That’s 2-4 years for most users. The Battery University provides detailed guidance on maximizing battery lifespan.
Temperature affects performance and longevity. Don’t store your vacuum in extreme heat or cold. Garages in summer or winter aren’t ideal. Keep it at room temperature.
Partial charges are better than full cycles. Modern batteries don’t need complete discharge. In fact, that harms them. Charge when convenient, not just when empty.
Understanding Power Delivery (Corded)
Corded vacuums have their own technical considerations. Understanding these helps you choose the right model.
Motor Power and Suction
Watts don’t tell the whole story. A 1200W motor isn’t necessarily better than 800W. Efficiency and design matter more. Look for air watts instead. This measures actual suction power.
Modern corded vacuums are surprisingly efficient. Energy regulations in the UK and EU limit motor wattage. Manufacturers improved efficiency to maintain performance. Today’s 900W motor often outperforms yesterday’s 2000W beast.
Sealed systems matter more than raw power. Air leaks waste suction. The best vacuums seal the entire airflow path. This maximizes the motor’s effectiveness.
Cord Length Considerations
Longer isn’t always better. A 40-foot cord sounds great. But rewinding 40 feet gets tedious. And you’re dragging all that cord around. 25-30 feet is the sweet spot.
Automatic cord rewind is worth it. Press a button, the cord disappears. Models without this feature? You’re wrapping manually. That gets old fast.
Cord storage design matters. Some vacuums have clever cord wraps. Others just have hooks. Consider how you’ll actually use this feature.
Performance Comparison: Cordless vs Corded
Let’s compare actual cleaning performance. This is where the rubber meets the road.
Carpet Cleaning Performance
Corded vacuums generally win on deep carpet cleaning. They maintain consistent, powerful suction. This agitates carpet fibers better. Embedded dirt and pet hair come up more easily.
High-end cordless models are catching up. Premium cordless vacuums now rival mid-range corded performance. But expect to pay £400+ for this capability. Budget cordless models still lag behind.
Brush roll technology matters more than power source. Self-adjusting brush rolls work on both types. Anti-tangle designs prevent hair wrap-up. Focus on these features regardless of cord status.
Hard Floor Cleaning Performance
Both types excel on hard floors. Honestly, it’s nearly a tie. Cordless models are slightly more convenient. But corded models clean just as well.
The key is avoiding scratches. Both types can damage floors if poorly designed. Look for soft wheels and gentle brush rolls. Turn off the brush for bare floors.
Debris pickup is excellent on both. Dirt, dust, and crumbs disappear easily. Hard floors don’t demand the power that carpets require.
Pet Hair Removal
This is where corded vacuums edge ahead. Pet hair requires sustained, powerful suction. Cordless models work fine initially. But as batteries drain, effectiveness decreases.
Specialized pet tools help both types. Motorized brush heads for upholstery are game-changers. These work on both corded and cordless models. For our recommended pet hair vacuums, check out our best battery vacuum cleaners guide for cordless options.
Multiple pet households might prefer corded. You can clean thoroughly without time pressure. No worrying about battery life mid-session.
Allergen and Dust Management
HEPA filtration is available on both types. The filtration quality isn’t determined by power source. Look for sealed systems with certified HEPA filters.
Thorough allergen cleaning takes time. Corded vacuums let you work methodically. Cordless models might rush you. This could leave allergens behind.
Dust bin emptying is messier on bagless models. This affects both cordless and corded. If allergies are severe, consider bagged options.
Let’s talk money honestly. The purchase price is just the beginning.
Initial Purchase Costs
Budget cordless vacuums start around £150. However, performance at this price is mediocre. Expect £250-£400 for quality cordless models. Premium options exceed £600.
Budget corded vacuums start around £80. Decent models range £120-£250. Excellent corded vacuums rarely exceed £400. You get more power per pound spent.
The price gap narrows at the premium end. A £500 cordless and £500 corded both offer excellent performance. The difference is convenience versus runtime.
Ongoing Operating Costs
Corded vacuums have minimal ongoing costs. Replace filters annually (£10-£20). Replace bags if applicable (£20-£30 yearly). That’s it.
Cordless vacuums add battery replacement. After 2-4 years, batteries degrade significantly. Replacement costs £50-£100. Some manufacturers charge even more.
Both types might need brush roll replacements. Worn bristles reduce effectiveness. These cost £15-£30. Frequency depends on usage.
The convenience premium for cordless is about £280 over five years. That’s roughly £56 annually. Decide if the freedom from cords justifies this cost.
Premium cordless models cost even more long-term. A £600 cordless plus battery replacement? You’re at £780 total. Compare this to a £300 premium corded vacuum.
Budget constraints favor corded models. You get excellent performance for less money. The trade-off is convenience and storage space.
Practical Use Cases: Which Type Wins?
Let’s examine real-world scenarios. This clarifies which type suits different situations.
Small Apartments and Studio Flats
Cordless vacuums dominate here. Limited space makes storage crucial. Wall-mounted cordless models disappear. Runtime isn’t an issue with smaller areas.
Quick cleanups happen more often. The convenience encourages regular vacuuming. Your home stays cleaner with less effort.
Limited outlets in older flats? Another cordless advantage. No hunting for outlets or managing cords. Just grab and clean.
Large Family Homes
This is where it gets complicated. Corded vacuums offer unlimited runtime. Large areas demand this. However, multiple floors favor cordless convenience.
Consider a hybrid approach. A powerful corded vacuum for thorough weekly cleans. A cordless for daily touch-ups and spills. This combination works brilliantly.
Budget might determine your choice. Can’t afford both? A quality corded vacuum handles everything. It just requires more effort.
Multi-Story Homes
Cordless vacuums are nearly essential here. Carrying a corded vacuum up and down stairs is exhausting. Plus managing that cord on stairs? Frustrating.
One cordless vacuum can handle all floors. Move freely between levels. No cord catching on banisters or steps.
Battery life might limit you. Clean one floor per charge. This adds time to your routine. But it’s still easier than dragging a corded model.
Homes with Mostly Hard Floors
Either type works wonderfully. Hard floors don’t demand maximum power. Cordless convenience makes sense here. Cleaning is quick and easy.
Corded models still work great. Just more hassle with the cord. If you already own one, no need to switch.
Robot vacuums also shine on hard floors. They handle daily maintenance. Add a cordless for spots and edges. Perfect combination.
Carpet-Heavy Homes
Corded vacuums typically perform better here. Deep carpet cleaning needs sustained power. Batteries drain quickly on thick carpet.
If choosing cordless, invest in premium models. Look for high voltage and large battery capacity. Budget cordless struggles on heavy carpet.
Pet owners face unique challenges. Hair accumulates quickly. Daily cleaning is necessary. Cordless convenience encourages this routine.
However, thorough pet hair removal needs power. Corded vacuums provide this consistently. Again, a hybrid approach works well.
Consider vacuum type, then add pet-specific tools. Motorized brush heads and crevice tools help tremendously. These matter more than cord status.
Storage and Convenience Factors
Daily usability affects your satisfaction long-term. These practical factors matter more than you’d think.
Storage Solutions
Cordless vacuums win on storage. Wall mounts take minimal space. Your vacuum hangs out of sight. Small homes benefit enormously.
Corded uprights need closet space. They’re bulky and have that cord. You need 2-3 square feet of floor space. Plus somewhere for attachments.
Corded canister vacuums are even worse. The canister, hose, and wand need storing. They’re awkward to organize. Consider where it’ll live before buying.
Grab-and-Go Factor
How quickly can you start cleaning? Cordless wins decisively. It’s always charged and ready. Grab it and go.
Corded vacuums require setup. Unwinding the cord, finding an outlet, plugging in. Maybe 30-60 seconds total. Sounds minor, but it affects usage.
This convenience difference influences behavior. Easier vacuums get used more often. Your home stays cleaner overall.
Post-Cleaning Cleanup
Emptying dust bins takes time on both types. Cordless bins are smaller, so more frequent. Corded bins are bigger but heavier when full.
Cord storage on corded models adds time. Manual winding is tedious. Automatic rewind helps significantly.
Maintenance like filter cleaning applies to both. This isn’t a deciding factor between types.
Environmental Considerations
Let’s talk sustainability. This matters to many people choosing vacuum types.
Energy Consumption
Corded vacuums use electricity while running. Modern models are efficient, typically 700-900W. A 30-minute cleaning session uses about 0.5 kWh. That’s roughly 15p per cleaning.
Cordless vacuums charge their batteries. A full charge uses about 0.2-0.3 kWh. That’s about 6-9p per charge. Seems cheaper initially.
However, battery production has environmental costs. Mining lithium and manufacturing batteries require significant energy. The Environmental Protection Agency’s battery recycling page explains proper disposal and environmental impacts.
Product Lifespan and Waste
Corded vacuums typically last longer. Without batteries to degrade, they function for 10+ years. Longer lifespan means less waste.
Cordless vacuum batteries limit product life. After 4-5 years, battery replacement costs rival buying new. Many people just replace the whole unit. This creates more e-waste.
Repairability favors corded models. They’re simpler mechanically. Parts are easier to replace. Cordless models integrate batteries tightly, complicating repairs.
Recycling and Disposal
Both vacuum types eventually need disposal. Metal and plastic components recycle similarly. The difference is battery disposal.
Lithium-ion batteries require special recycling. Don’t throw them in regular trash. Find proper recycling facilities. Many retailers accept old batteries.
Manufacturers’ take-back programs help. Some brands accept old vacuums for recycling. Check if your chosen brand offers this.
Making Your Final Decision
You’ve absorbed tons of information. Now let’s convert that into a clear decision.
The Cordless Vacuum Is Right for You If:
Your home is under 1,500 square feet. Battery life handles this comfortably. You won’t feel limited.
You have multiple floors or stairs. The convenience factor is massive here. Cordless transforms multi-level cleaning.
Quick daily cleanups matter more than deep weekly cleans. Cordless encourages regular vacuuming. Your home stays consistently cleaner.
Storage space is limited. Small flats and apartments benefit enormously. Wall mounting saves precious space.
You have mostly hard floors or low-pile carpet. These surfaces don’t drain batteries quickly. Performance remains excellent.
Budget allows £250-£400 for quality performance. Cheaper cordless models disappoint. Invest properly or choose corded.
The Corded Vacuum Is Right for You If:
Your home exceeds 2,000 square feet. Unlimited runtime becomes essential. Battery anxiety disappears.
You have thick carpets or lots of pet hair. Sustained power makes deep cleaning easier. Performance doesn’t diminish mid-session.
Budget is tight (under £200). Corded models deliver better value. You sacrifice convenience, not cleaning ability.
You clean thoroughly once or twice weekly. Long sessions benefit from unlimited runtime. No interruptions for recharging.
You have single-level living spaces. Cord management is easier without stairs. The main cordless advantage disappears.
You plan to keep your vacuum 5+ years. No battery replacement costs. Same performance throughout ownership.
Questions to Ask Yourself
How often do you vacuum? Daily quick-cleaners favor cordless. Weekly deep-cleaners favor corded.
What frustrates you about current cleaning? Cord tangles? Choose cordless. Weak suction? Choose corded.
What’s your physical capability? Lighter cordless models are easier to handle. Heavy corded models cause fatigue.
Where will you store it? Answer this before buying. Make sure it fits your reality.
What’s your total budget? Include potential battery replacement for cordless. Calculate 5-year ownership costs.
Common Mistakes to Avoid
I’ve seen people make these errors repeatedly. Learn from their experiences.
Choosing Based on Trends Alone
Cordless vacuums are trendy. Everyone raves about them. But trends don’t determine your needs. Your home’s specific requirements matter more.
Don’t buy cordless just because it’s popular. Evaluate if it actually solves your problems. Otherwise, you’ve wasted money on inconvenient convenience.
Ignoring Runtime Reality
Marketing claims are wildly optimistic. Manufacturers test in ideal conditions. Real-world runtime is 30-50% less.
Test your home’s vacuum time. Use your current vacuum and time it. If it takes 25 minutes, a 30-minute cordless barely works. Be honest about needs.
Underestimating Battery Costs
Replacement batteries are expensive. People forget this when comparing prices. A £300 cordless plus £80 battery equals £380 real cost.
Factor in at least one battery replacement over ownership. This gives a fairer price comparison with corded models.
Buying the Cheapest Option
Budget cordless vacuums under £150 mostly disappoint. Weak suction, terrible battery life, poor build quality. You’ll regret it quickly.
If budget is tight, buy a quality corded vacuum instead. £150 buys an excellent corded model. It buys a mediocre cordless one.
Not Testing Weight and Handling
Specifications list weight in pounds. But how it feels matters more. A well-balanced 7-pound vacuum feels lighter than a poorly designed 6-pound one.
Visit a store and handle models if possible. Lift them, push them, carry them. Your arms and back will thank you.
Forgetting About Attachments
The main vacuum is just part of the system. Attachments extend functionality enormously. Both corded and cordless models offer these.
Ensure attachments work with your chosen type. Some cordless models lose power with attachments. This defeats the purpose.
Our Top Recommendations
After testing dozens of models, here are my suggestions based on different needs and budgets.
Best Cordless for Small to Medium Homes
Look for models with 30-40 minute runtime on standard mode. Removable batteries are a huge plus. Wall-mounted charging keeps things tidy.
Expect to spend £280-£400 for reliable performance. Cheaper options work but with limitations. This price range balances features and quality well.
Key features: motorized brush head, multiple power modes, washable filters. These ensure versatility and low operating costs.
Don’t dismiss budget corded vacuums. Several excellent models cost £120-£180. They offer solid performance without fancy features.
Look for models from established brands. Warranty coverage is essential at this price. Avoid unknown brands with suspicious reviews.
Expect good carpet and hard floor performance. Don’t expect premium features like LED lights or app connectivity.
Best Hybrid Approach
Many households benefit from owning both types. A powerful corded upright for weekly deep cleans. A lightweight cordless for daily maintenance.
Total investment: £400-£600 for both. This sounds expensive initially. But you get the best of both worlds. Your cleaning routine becomes efficient and thorough.
The cordless handles spills and quick cleanups. The corded tackles deep cleaning sessions. Together, they keep your home spotless.
Frequently Asked Questions
How long do cordless vacuum batteries really last?
Real-world cordless runtime is 15-40 minutes depending on power mode and floor type. High power on carpet drains batteries in 15-20 minutes. Eco mode on hard floors might last 50-60 minutes. Marketing claims often use eco mode with no load.
Are cordless vacuums as powerful as corded?
Premium cordless models (£400+) match mid-range corded performance. Budget cordless vacuums (under £200) lag behind significantly. For equivalent power to a £200 corded vacuum, expect to spend £350-£400 on cordless.
What happens when a cordless vacuum battery dies?
You can purchase replacement batteries from manufacturers. These typically cost £50-£100. Some brands make this easy, others don’t sell batteries separately. Check replacement battery availability before purchasing.
Do corded vacuums last longer than cordless?
Generally yes. Without batteries to degrade, corded vacuums often last 10+ years. Cordless vacuums typically last 4-6 years before battery replacement becomes necessary. However, modern cordless technology is improving longevity.
Can I use a cordless vacuum for whole-house cleaning?
Depends on home size. Homes under 1,500 square feet usually clean on one charge. Larger homes might need multiple charges or battery swaps. Removable spare batteries solve this problem but add cost.
Which type is better for stairs?
Cordless vacuums excel on stairs. They’re lighter and have no cord to manage. Cleaning stairs with a corded vacuum is awkward and tiring. This is one area where cordless clearly wins.
Are robot vacuums an alternative to both?
Robot vacuums handle maintenance cleaning brilliantly. However, they can’t replace manual vacuuming entirely. They miss corners, struggle with thick carpets, and can’t clean upholstery. Consider them as supplementary, not replacement.
Conclusion On How to Choose Between Cordless and Corded Vacuum Cleaners
Choosing between cordless and corded vacuum cleaners comes down to understanding your priorities. Both types excel in different situations. There’s no universally “best” choice.
Cordless vacuums offer unmatched convenience. They’re perfect for multi-level homes, quick cleanups, and limited storage. The freedom from cords transforms your cleaning routine. However, you’ll pay more upfront and face eventual battery costs.
Corded vacuums provide unlimited runtime and consistent power. They’re ideal for large homes, thick carpets, and budget-conscious buyers. The cord requires management, but performance never wavers. For deep cleaning sessions, they remain unbeaten.
Consider your home’s size, layout, and flooring. Think about your cleaning frequency and habits. Evaluate your budget honestly, including long-term costs. These factors guide you toward the right choice.
Many households benefit from owning both types. A cordless for daily maintenance, a corded for weekly deep cleans. This hybrid approach maximizes cleaning efficiency. Your home stays consistently clean with minimal frustration.
Don’t rush this decision. Visit stores and handle different models. Read reviews from people with similar homes. Your vacuum will be part of your life for years. Choose wisely, and cleaning becomes easier, not more frustrating.
Feeling more confident about how to choose between cordless and corded vacuum cleaners? Ready to make your choice? Explore our detailed guides linked throughout this article. We’ve tested and ranked the best models in each category. Your perfect vacuum is waiting.